When I bought my 1950s ranch house, the original tile countertops were still intact, and everyone told me to rip them out immediately. Instead, I fell in love with those cheerful yellow tiles and their quirky charm. That decision led me down a fascinating path of learning about retro tile countertops, from restoration techniques to installing new vintage-style surfaces. I discovered that tile countertops offer a unique combination of durability, repairability, and personality that modern solid surfaces simply can’t match. Whether you’re restoring original tiles or creating a new retro-inspired kitchen, these countertops bring warmth and character that make cooking feel special. Let me share everything I learned about working with retro tile countertops and why they might be the perfect choice for your kitchen.
Choosing Authentic Vintage Tile Styles and Colors
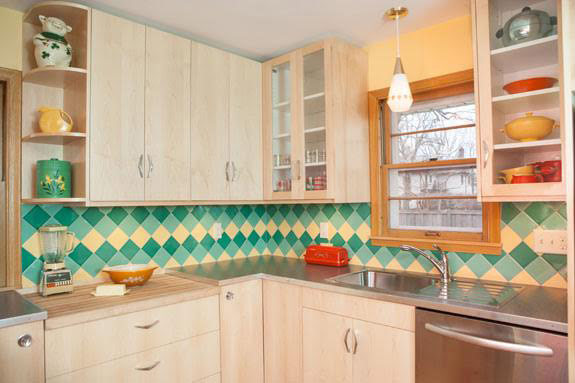
Selecting the right tile style set the tone for my entire retro kitchen aesthetic. I researched popular patterns from different decades to understand what would be historically appropriate for my 1950s home. The postwar era loved bold colors like turquoise, pink, yellow, and mint green, often combined with black or white accent tiles. I found that 4×4-inch tiles were the most common size for countertops during this period, though some installations used smaller mosaics or larger 6×6 tiles. The square format with contrasting grout lines created that classic checkerboard or grid pattern that screams mid-century.
Color psychology played into my decision more than I expected. I wanted my kitchen to feel happy and energizing, so I gravitated toward warm tones. I chose a soft butter yellow for the main field tiles with occasional navy blue accent tiles scattered throughout for visual interest. This combination felt authentic to the 1950s while being cheerful rather than overwhelming. I learned that authentic vintage tiles often have slight color variations within the same batch, which adds to their charm. Modern reproduction tiles sometimes look too perfect and uniform, missing that handcrafted quality that makes vintage tiles special.
Glaze finish significantly impacts both appearance and practicality. I chose glossy tiles because they’re easier to clean and reflect light beautifully, making my kitchen feel brighter. The shiny surface also felt more authentic to the mid-century aesthetic when high-gloss finishes were popular. Matte tiles offer a more subdued, sophisticated look but show water spots and require more maintenance. Semi-gloss splits the difference, providing some sheen while being slightly more forgiving. I tested different finishes by looking at samples in my actual kitchen lighting, which revealed how dramatically the finish affects color perception and overall mood.

Installing Tile Countertops Over Existing Surfaces
Working over my existing plywood countertop base saved time and money compared to complete demolition. I first assessed whether the existing structure was solid enough to support tile, checking for any flex or weak spots that could cause cracking. My countertops were stable and level, which was perfect. I thoroughly cleaned and lightly sanded the surface to help the mortar bond properly. For areas that weren’t perfectly level, I used thinset mortar to build up low spots, creating a flat plane for the tiles.
Installing cement board over the plywood provided the ideal substrate for tile. I cut the cement board to fit my countertop dimensions using a utility knife to score it, then snapping along the score line. I secured it with cement board screws every six inches, making sure the screw heads sat slightly below the surface. At seams, I applied fiberglass mesh tape and covered it with thinset mortar to create a smooth, continuous surface. This step was crucial because any imperfection in the substrate would telegraph through to the finished tile surface.
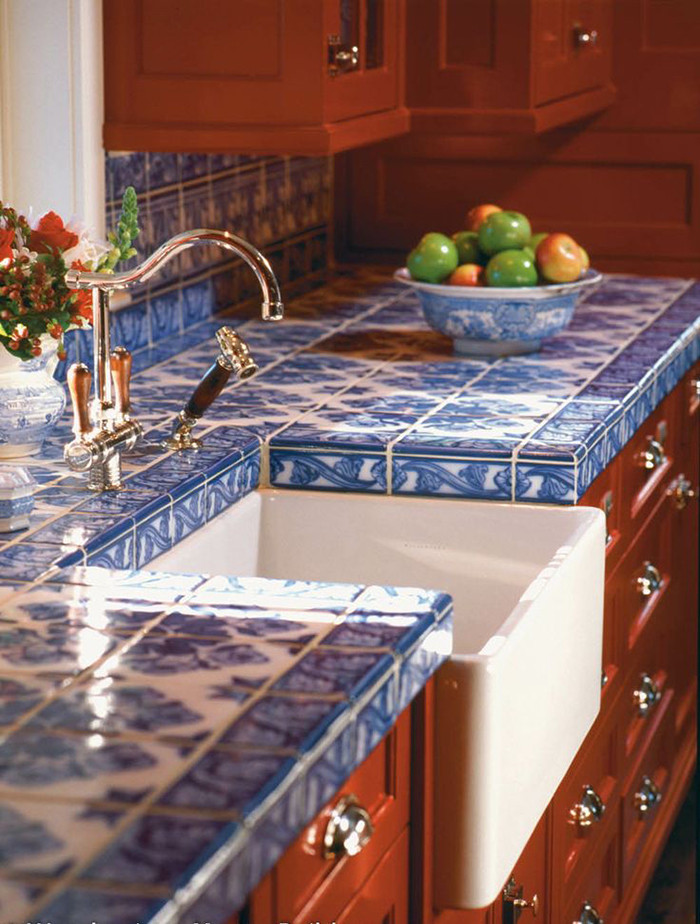
The edge treatment required special planning since it’s highly visible and subject to impact. I chose a wood edge trim that I stained to match my cabinets, which creates a nice frame for the tile field and protects the edges from chips. Some people use bullnose tiles or metal edge trim, but I loved the warmth of wood against the colorful tiles. I installed the wood trim first, making sure it was perfectly level and aligned, then tiled right up to it. This created clean lines and gave me something to butt the field tiles against, making the layout much easier. The combination of tile and wood felt authentic to vintage installations I’d seen in period homes.

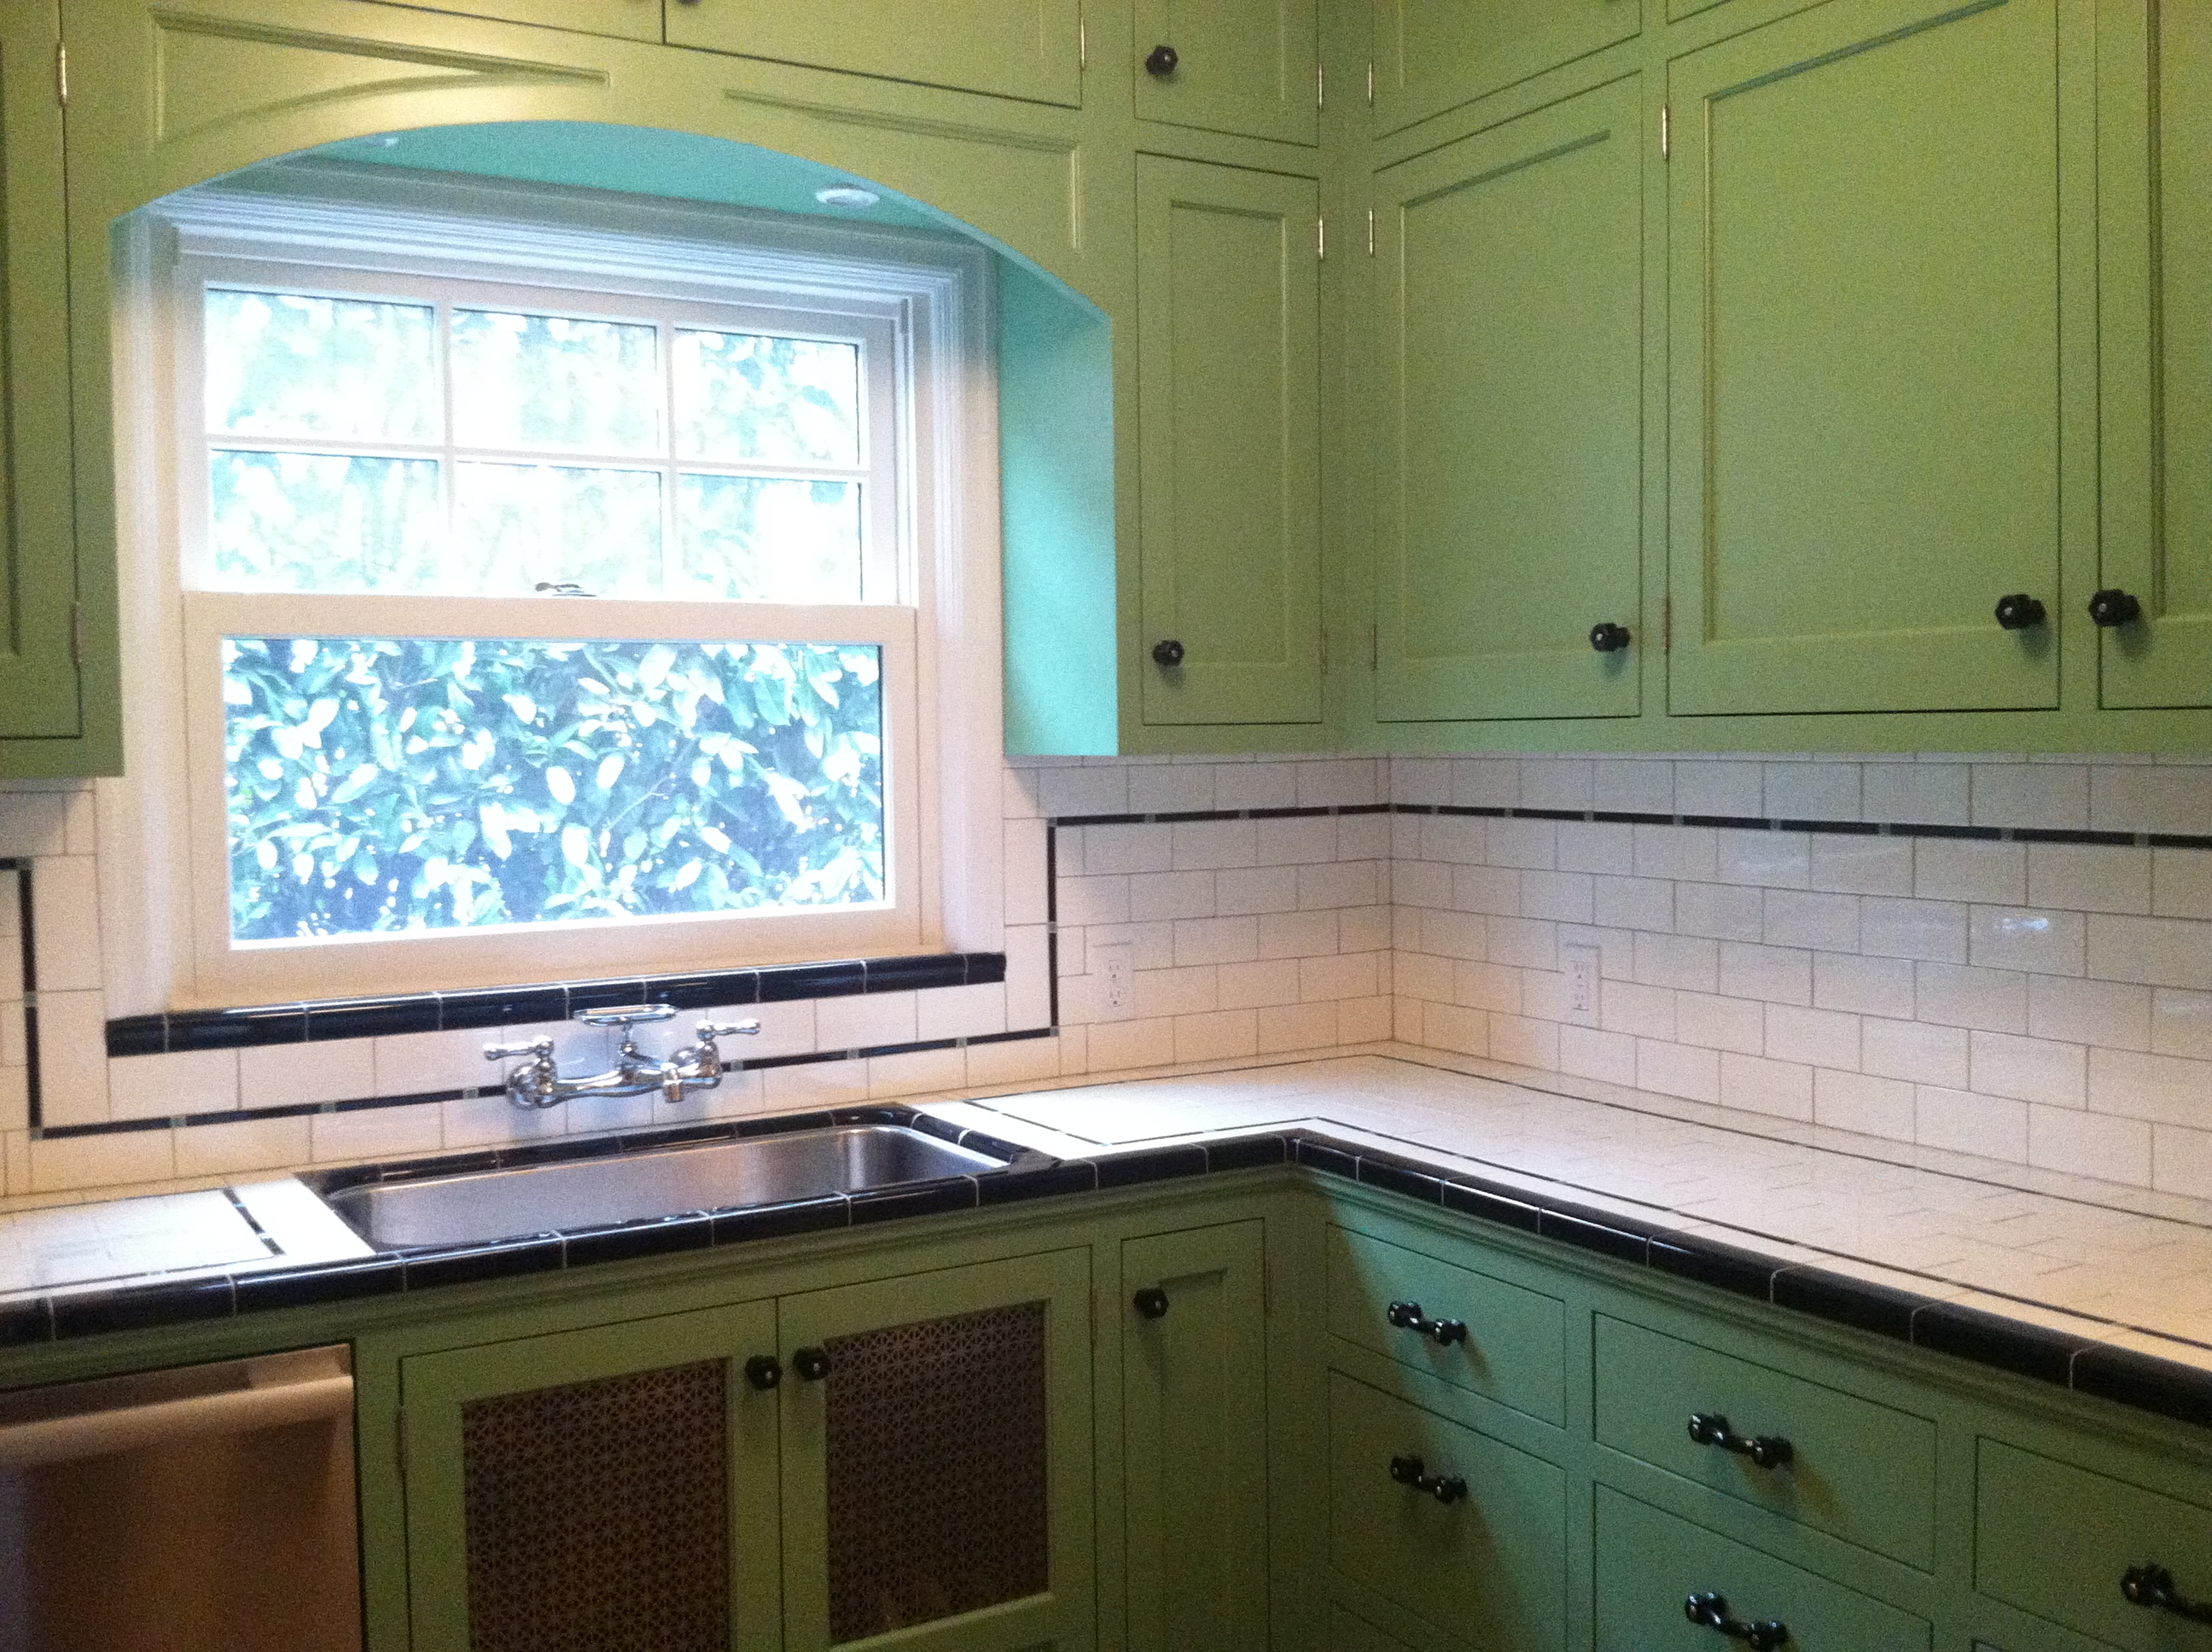
Grouting Techniques for a Period-Appropriate Look
Grout color transformed the entire appearance of my countertop, and choosing the right shade took serious consideration. I tested several colors on sample boards, ultimately selecting a warm gray that complemented my yellow tiles without competing for attention. Pure white grout would have created too much contrast and felt too contemporary, while black would have been too stark. The gray bridges between the tiles provide subtle definition without overwhelming the color scheme. I learned that grout color can either blend tiles for a unified look or create strong grid lines that emphasize individual tiles.
Mixing and applying grout properly prevented problems down the road. I used unsanded grout because my grout lines were narrow, only about 1/8 inch, and sanded grout could have scratched my glossy tile surface. I mixed the grout to a peanut butter consistency, letting it slake for ten minutes before mixing again, which activates the polymers and creates a stronger final product. I worked in small sections, spreading grout diagonally across the tiles with a rubber float, forcing it deep into the joints. Timing the cleanup was critical; I waited until the grout started to firm up before wiping with a damp sponge, rinsing frequently to avoid pulling grout out of the joints.
Sealing the grout was essential for a kitchen countertop that would face daily spills and moisture. I waited the recommended cure time, usually 72 hours, before applying a penetrating grout sealer. I used a small applicator bottle to carefully apply sealer only to the grout lines, wiping off any that got on the tile surface immediately. Two coats provided thorough protection. I reapply sealer annually to maintain stain resistance, which takes maybe an hour and keeps my grout looking fresh. This maintenance step has proven invaluable for preserving the crisp appearance of my grout lines despite heavy kitchen use with coffee, wine, and tomato sauce spills.
Creating Custom Patterns and Accents
Once I mastered basic tile layout, I got creative with patterns that added personality to my countertops. I designed a checkerboard pattern for my breakfast bar using alternating yellow and white tiles, which created a fun, playful vibe perfect for that casual eating area. The pattern required careful planning to ensure it centered properly and didn’t end with awkward cuts at the edges. I dry-laid the entire pattern before mixing any mortar, adjusting the layout until everything looked balanced and intentional.
Accent tiles added focal points without overwhelming the design. I incorporated vintage-style decorative tiles with atomic era patterns at regular intervals across my main countertop, creating visual interest that draws the eye. I found reproduction tiles online that matched my color scheme and featured period-appropriate designs like starbursts and boomerang shapes. Placing these accent tiles required planning. I mapped out their positions to create rhythm and balance, making sure they related to functional elements like the sink and stove rather than appearing randomly placed.
Border treatments defined the edges and added a finished look. I used a contrasting navy blue tile as a border running along the front edge of my countertop, which frames the yellow field and creates definition. This simple detail made the countertop look intentional and custom rather than just tiles laid in a basic grid. I’ve seen vintage kitchens with multiple border rows creating elaborate frames, and while beautiful, I found that simpler was better for my space. The single row of contrast creates impact without feeling busy or competing with my colorful backsplash tiles.

Maintaining and Caring for Tile Countertops
Daily cleaning of my tile countertops is straightforward and keeps them looking great. I wipe them down after meal prep with a damp microfiber cloth and mild dish soap, which removes food particles and prevents staining. For deeper cleaning, I use a pH-neutral tile cleaner once a week, spraying it on and wiping with a soft cloth. I avoid abrasive scrubbers that could scratch the glaze and acidic cleaners like vinegar that can damage grout over time. The sealed grout resists staining well, though I’m diligent about wiping up coffee and wine spills promptly since these can still penetrate if left sitting.
Addressing chips and cracks became a necessary skill since tile can be damaged by impact. I’ve had to replace two tiles over the years, one from dropping a cast iron skillet and another from an unfortunate incident with a standing mixer. I keep spare tiles from my original installation for exactly this purpose. Replacing a tile involves carefully chipping out the damaged tile and grout around it, cleaning the substrate, and setting a new tile with fresh thinset. After it cures, I regrout around it. The repair is nearly invisible, which is one major advantage tile has over solid surface countertop,s where damage often can’t be repaired.
Resealing grout maintains its stain resistance and appearance over time. I do this annually as preventive maintenance, though high-use areas around the sink might need it more frequently. I clean the countertop thoroughly first, then apply grout sealer with a small brush or applicator bottle, working it into the grout lines. I wipe excess off the tile surface immediately to prevent haze. This simple maintenance step has kept my grout looking almost as good as the day I installed it. The small time investment pays off in countertops that continue to look fresh and clean despite daily cooking and food prep activities.

Addressing Common Concerns About Tile Countertops
The grout line issue was something everyone warned me about, but I’ve found it less problematic than expected. Yes, grout joints create slight valleys between tiles, but they’re not the cleaning nightmare people predicted. Properly sealed grout resists staining and wipes clean easily with normal cleaning. I use a small grout brush for occasional deep cleaning, which takes just a few minutes. The key is staying on top of sealing; once grout is properly sealed and maintained, it performs beautifully. I actually appreciate the slight texture the grout lines create; it adds character that flat, solid surfaces lack.
Surface levelness concerned me initially since tiles create an inherently non-continuous surface. The slight height variations at tile edges mean things don’t slide across my countertop quite as smoothly as they would on granite or quartz. However, I’ve adapted completely and rarely notice anymore. I use cutting boards for food prep, which would be necessary with any countertop material anyway. For rolling out dough, I have a large pastry mat that creates a smooth working surface. The practical impact is minimal, and I’d take the charm and repairability of tile over a perfectly smooth surface any day.
Heat resistance proved to be one of tile’s major advantages. I can set hot pots directly on the tiles without worry, though I still use trivets out of habit and to protect the grout. The ceramic tiles themselves are virtually indestructible by heat, which gives me confidence that my countertops will last for decades. This durability, combined with the ability to replace individual damaged tiles rather than entire sections, makes tile surprisingly practical despite its reputation as high-maintenance. After several years of use, I’m convinced that tile’s drawbacks are overstated while its benefits, especially character, repairability, and heat resistance, are underappreciated.

How much does it cost to install retro tile countertops?
I spent about $800 for my 35 square feet of countertop, including tiles at $3-5 per square foot, thinset, grout, sealer, cement board, and edge trim. Vintage reproduction tiles cost more than basic ceramic, running $5-15 per square foot for quality options. Professional installation would add $10-20 per square foot, so DIY saved me significantly. Authentic salvaged vintage tiles can be expensive and hard to source in quantity. Budget $15-30 per square foot total for DIY or $30-50 with professional installation.
Are tile countertops sanitary for food preparation?
Yes, when properly installed and maintained. Glazed ceramic tile is non-porous and doesn’t harbor bacteria. The grout is the concern, but modern polymer-modified grout and proper sealing create a sanitary surface. I seal my grout annually and clean it with an antibacterial cleaner regularly. I use cutting boards for food prep, like you should with any countertop material. Studies show properly maintained tile is as sanitary as solid surfaces. The key is good sealing and regular cleaning, which, honestly, isn’t difficult.
Can I install tile over laminate countertops?
Yes, I’ve successfully tiled over laminate in my laundry room. The laminate must be well-bonded with no loose areas, and you should rough up the surface with coarse sandpaper to help with adhesion. I applied a bonding primer designed for non-porous surfaces before setting tile. Some installers prefer removing laminate to ensure a solid substrate, but tiling over intact laminate works well if properly prepared. The existing laminate edge needs covering with trim or tile. This approach saved demolition work and disposal costs.
How do tile countertops hold up to daily kitchen use?
Mine have performed excellently for four years of daily cooking. The glazed tiles resist staining, scratching, and heat damage. I’ve had two tile breaks from impact, but replacing individual tiles is easy with spares on hand. The grout shows some minor staining in high-use areas despite sealing, but nothing dramatic. Overall durability matches or exceeds laminate and rivals solid surfaces. The ability to repair rather than replace entire sections is a huge practical advantage. I expect these countertops to last for decades with basic maintenance.
What tile size works best for kitchen countertops?
I used 4×4-inch tiles, which is classic for vintage kitchens and create manageable grout lines. Smaller tiles like 2×2 or mosaic sheets increase grout area, creating more maintenance but interesting patterns. Larger 6×6 tiles reduce grout lines but can look less authentically retro. Scale matters; smaller kitchens benefit from smaller tiles, while large kitchens can handle bigger formats. Consider that smaller tiles offer more flexibility in navigating sinks and edges. I’m happy with 4×4 as the sweet spot between aesthetics and practicality.
Where can I find authentic vintage tiles for countertops?
Architectural salvage yards are my first stop for genuine vintage tiles, though finding enough matching pieces for a whole countertop is challenging. I’ve found individual accent tiles this way. Online marketplaces like eBay and Etsy have sellers specializing in vintage tile, but shipping costs add up quickly. For complete projects, I recommend reproduction tiles from companies like Fireclay Tile, Mercury Mosaics, or Subway Ceramics that create authentic-looking period tiles in consistent quantities. These cost more than basic tile but less than true antiques.

Vintage 1960s kitchen tile design ideas & popular retro mosaic

Related articles: