When I decided to splurge on Italian marble countertops for my kitchen renovation, everyone warned me about the maintenance, the staining, and the expense. I listened politely and installed Carrara marble anyway, and three years later, I have zero regrets. Yes, my counters have developed a patina with a few faint stains and etch marks, but they’ve only become more beautiful as they’ve aged. The luminous quality of natural marble, the cool touch under my hands when I’m rolling out pasta dough, and the undeniable elegance it brings to my kitchen make every moment of care worthwhile. Let me share what I learned about choosing, installing, and living with these stunning natural stone surfaces.
Understanding Different Types of Italian Marble
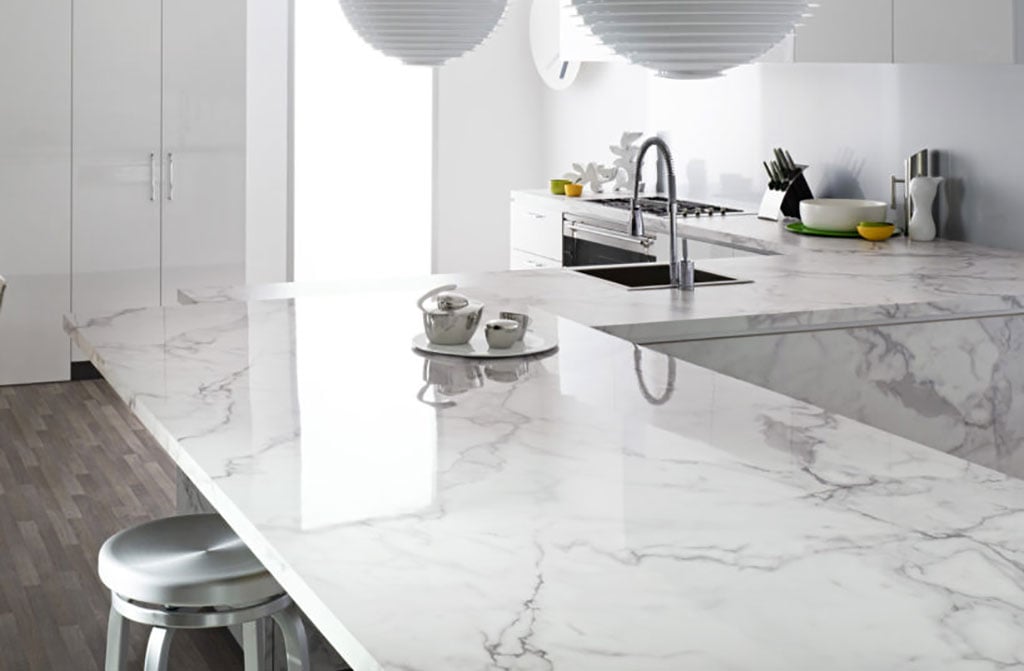
My marble education began at a stone yard where I stood surrounded by massive slabs, completely overwhelmed by choices. I quickly learned that “Italian marble” encompasses numerous varieties, each with distinct characteristics, colors, and veining patterns. Carrara marble, quarried from the Apuan Alps in Tuscany, became my focus due to its classic white or blue-gray coloring with soft, feathery veining that has graced Italian sculptures and architecture for centuries.
Calacatta marble, often confused with Carrara, features bolder, more dramatic veining in warmer gold and gray tones against a brighter white background. I seriously considered Calacatta for its show-stopping appearance, but the price, often three times higher than Carrara, pushed it beyond my budget. I also discovered Statuario marble, the rarest and most expensive Italian variety, with striking veining and a pure white background that commands prices of $180 per square foot or more, compared to Carrara’s $75 to $100.
I spent hours examining slabs, learning that each piece of marble is utterly unique. Two slabs from the same quarry can look dramatically different, which makes selection both exciting and stressful. I learned to view entire slabs rather than small samples, as the veining pattern and color distribution across a full slab determine how your finished counters will appear. This careful selection process ensured I got exactly the look I wanted, with veining that flowed beautifully across my island and perimeter counters.

Weighing the Pros and Cons of Marble Counters
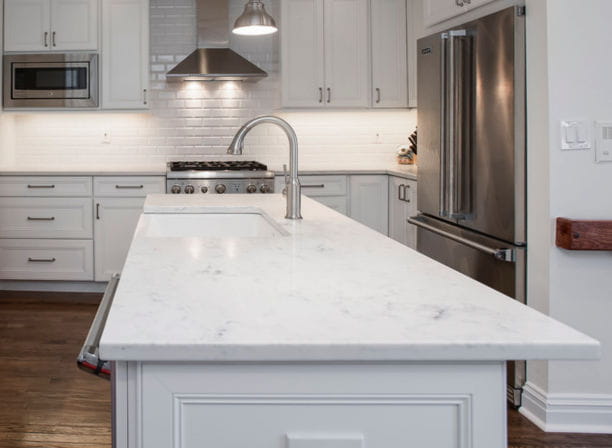
Before committing to marble, I needed to honestly assess whether its beauty justified the maintenance requirements and vulnerabilities. The pros were immediately obvious during my stone yard visits. Marble’s luminous quality comes from light penetrating the surface and reflecting, creating a glow that manufactured materials simply cannot replicate. The cool surface temperature makes marble ideal for pastry work, which I do frequently. The timeless elegance and increased home value also factored into my decision.
The cons required serious consideration. Marble is softer than granite or quartzite, meaning it scratches more easily. It’s also calcium-based, making it vulnerable to acidic substances like lemon juice, tomatoes, and wine, which can etch the surface by dissolving the calcium carbonate. Marble is porous and can stain from oils, colored liquids, and other substances if not properly sealed. I spent weeks researching these issues, reading both horror stories and success stories from other marble owners.
My decision came down to lifestyle compatibility. I’m a careful person who uses cutting boards religiously and wipes spills immediately. I often entertain and want counters that would impress guests while creating a sophisticated cooking environment. I decided that developing some patina over time aligned with my preference for spaces that show they’re lived in and loved. For someone who wants permanently pristine counters or has young children constantly spilling grape juice, marble might create stress rather than joy. Understanding your own tolerance for imperfection is crucial before choosing marble.
Selecting Your Slabs and Planning the Layout
Choosing my specific slabs became an unexpectedly emotional experience. I visited the stone yard three times before making my final selection, each time seeing different slabs and changing my mind about what I wanted. I learned that lighting dramatically affects marble’s appearance, so I viewed slabs both inside the warehouse and outside in natural sunlight. The veining that looked soft and elegant indoors sometimes appeared too bold or too subtle in different light.
I brought paint chips, cabinet samples, and photos of my kitchen to the stone yard, laying them against various slabs to visualize the final look. This preparation proved invaluable, as marble that looked perfect in isolation sometimes clashed with my warm oak cabinets or cool gray walls. I also learned about “book matching,” where consecutive slabs from the same block can be arranged to create mirror-image patterns. While beautiful, book-matching requires purchasing multiple slabs and careful planning, adding complexity and cost to the project.
The templating process, where fabricators create precise patterns of your countertop layout, became my opportunity to plan how veining would flow across my kitchen. My fabricator helped me position the slabs to create balanced veining distribution, avoiding situations where all the dramatic veining concentrates in one area while other sections look plain. We planned seams carefully, positioning them where veining patterns could hide the joints and in less visible locations like corners. This attention to layout details ensured my finished counters looked cohesive and intentional rather than randomly assembled.

Installation Process and What to Expect
Installation day arrived with both excitement and anxiety. The fabricators carried my slabs into the kitchen, wrapped in protective material, and I held my breath as they unwrapped each piece. Seeing the marble positioned on my cabinets for the first time was magical, even before it was permanently installed. The natural stone transformed my kitchen instantly from ordinary to extraordinary, validating every decision I’d made during this lengthy process.
The actual installation took about six hours for my kitchen, which included an island, perimeter counters, and a full-height backsplash behind my range. I watched as fabricators used special equipment to lift and position the heavy slabs, applied epoxy to seams, and carefully leveled everything. They cut openings for my sink and cooktop on-site using water-cooled diamond blades, a noisy and messy process that I’m glad happened in my space rather than at their shop, as it allowed final adjustments for a perfect fit.
Seam placement became my biggest concern during installation. Despite careful planning, seams are unavoidable in most kitchens due to slab size limitations and transportation constraints. My fabricators used color-matched epoxy to fill seams, and while not invisible, they’re far less noticeable than I’d feared. The installers also applied the initial sealer coat, though it needed several hours to cure before I could use my counters. Watching the installation helped me understand my marble’s construction and gave me confidence in its durability and proper support.

Daily Care and Maintenance Requirements
Living with marble taught me a care routine that’s become second nature after three years. I wipe my counters constantly, never letting spills sit, especially acidic substances. I keep microfiber cloths and pH-neutral stone cleaner under my sink, and quick cleanup after cooking has become automatic. This vigilance isn’t burdensome because my marble is so beautiful that caring for it feels like protecting something precious rather than performing a chore.
I reseal my counters every six months using a penetrating sealer specifically designed for marble. The process takes about thirty minutes. I simply apply the sealer with a cloth, let it absorb for ten minutes, then buff away excess. This regular sealing provides crucial protection against staining, though it doesn’t prevent etching from acids. I’ve learned to embrace minor etch marks as part of marble’s character. Some marks buffed out with marble polishing powder, while others remain as subtle reminders of meals prepared and memories made.
Hot pots and pans go directly on my marble without damage, as it’s heat-resistant up to about 300 degrees Fahrenheit. However, I always use trivets for extremely hot items from the oven or stovetop as a precautionary measure. Cutting boards protect both my knives and marble surface from scratches. I oil my wooden cutting boards on the marble surface without worry, as the stone’s cool temperature and smooth surface make it perfect for this task. These simple habits have kept my marble looking beautiful while allowing me to cook freely without constant anxiety.

Addressing Common Concerns and Misconceptions
The biggest misconception I’ve encountered is that marble counters will be ruined quickly by normal kitchen use. Three years in, my marble has developed character and patina, but it’s far from ruined. Yes, I have a few faint stains where red wine sat too long during a dinner party, and some subtle etch marks near my sink from lemon juice. But these imperfections tell stories and add to the natural beauty rather than detracting from it. Marble that looks slightly lived-in has more soul than pristine manufactured surfaces.
Another concern people raise is whether marble works in busy family kitchens versus just in showpiece spaces. While I don’t have young children, my friends with marble counters and kids report that it works fine with reasonable care. They teach children not to leave juice cups sitting on counters and use placemats during meals. The key is setting realistic expectations. If you want surfaces that will look factory-new forever, choose quartz. If you can appreciate how natural materials age and develop patina, marble rewards you with unmatched beauty.
Cost concerns are legitimate, as marble represents a significant investment. My Carrara marble cost about $8,500 installed for 55 square feet, including fabrication, installation, and initial sealing. That’s considerably more than laminate or tile, but comparable to or less than premium quartzite or quartz. I view it as a long-term investment in both my home’s value and my daily happiness. Walking into my kitchen every morning and seeing that luminous marble makes me smile, which is worth more to me than any amount of money I might have saved choosing different materials.

How much do Italian marble countertops typically cost?
Carrara marble, the most affordable Italian variety, runs $75-100 per square foot for materials, plus $40-60 per square foot for fabrication and installation. My kitchen cost about $8,500 total for 55 square feet. Calacatta marble costs $150-250 per square foot, while rare Statuario can exceed $300. These prices include edge profiles, cutouts for sinks, and installation. Shop around, as prices vary significantly between fabricators and stone suppliers.
Will acidic foods permanently damage my marble counters?
Acids cause etching, which dulls the polished surface but doesn’t structurally damage the stone. I’ve etched my marble a few times with lemon juice and tomatoes. Light etching often buffs out with marble polishing powder and some elbow grease. Deeper etches may remain visible, becoming part of the marble’s patina. I’ve learned to wipe acid spills immediately, which prevents most etching. The risk is manageable with reasonable care and awareness.

How often do marble counters need to be sealed?
I seal mine every six months using penetrating sealer, taking about 30 minutes each time. Some sources recommend quarterly sealing for heavily used kitchens, while others suggest annual sealing suffices. I test by dripping water on the surface; if it darkens the stone rather than beading up, it’s time to reseal. Quality sealer costs $20-40 per bottle and lasts for multiple applications. This maintenance is simple and becomes routine quickly.
Can I place hot pots directly on marble countertops?
Yes, marble is heat-resistant and won’t burn, crack, or discolor from normal cooking temperatures. I regularly place warm pots on my marble without issues. However, I use trivets for extremely hot cast iron or items straight from a 500-degree oven as extra precaution. The stone stays naturally cool, which is actually one of marble’s benefits for pastry work and general cooking prep. Heat isn’t a concern with marble like it is with some other materials.
Is marble suitable for bathroom vanities?
Absolutely. I installed Carrara marble in my master bathroom, and it’s performed beautifully. Bathrooms actually present fewer risks than kitchens, as you’re less likely to encounter acidic foods or cooking oils. The main bathroom concern is water rings, which I prevent by wiping the vanity dry after use. Bathroom marble develops less patina than kitchen marble, maintaining its pristine appearance longer. The elegance of marble enhances daily routines like a spa experience.
What’s the difference between honed and polished marble finishes?
Polished marble has a glossy, reflective surface that shows veining dramatically but reveals etching more obviously. Honed marble has a matte, velvety finish that’s less formal and hides etching better. I chose polished for its classic beauty and light-reflecting qualities. Honed marble works better for those concerned about visible etching or preferring understated elegance. Both finishes require similar sealing and care. The choice is purely aesthetic, reflecting your personal style preferences.

Related articles: