When I decided to tackle my kitchen renovation myself three years ago, I thought cutting laminate countertops would be straightforward, just another DIY task to check off my list. How wrong I was! After ruining two expensive pieces with amateur mistakes and nearly giving up entirely, I finally mastered the techniques that produce clean, professional-looking cuts. The key lessons I learned through trial and error, watching countless YouTube videos, and getting advice from experienced contractors transformed me from a frustrated beginner into someone who can confidently handle complex laminate cutting projects with precision and pride.
Essential Tools and Equipment for Clean Laminate Cuts
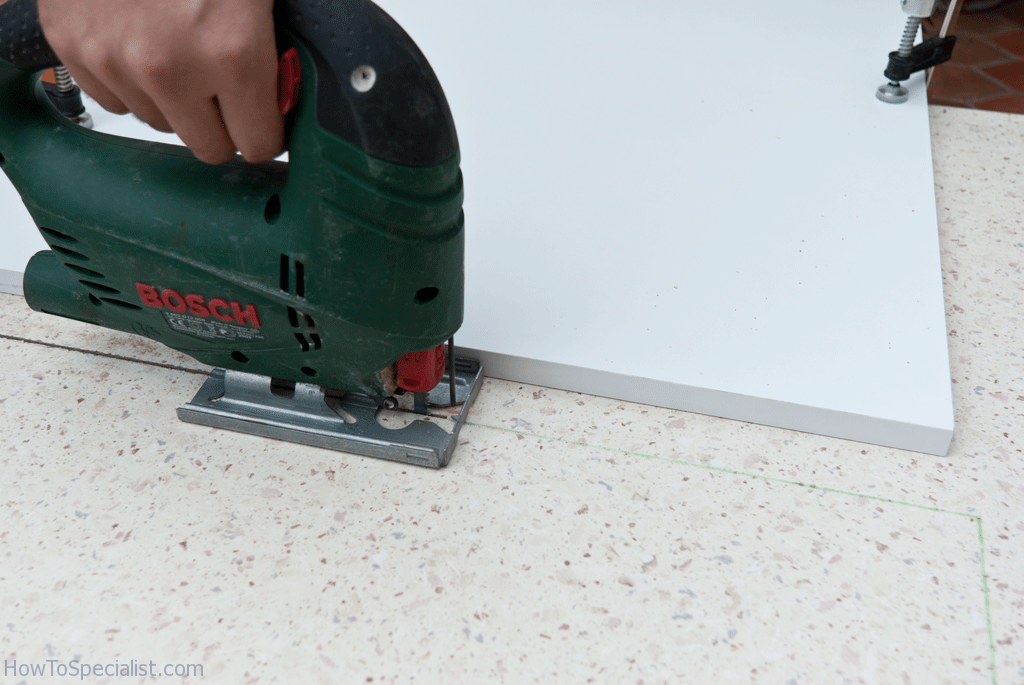
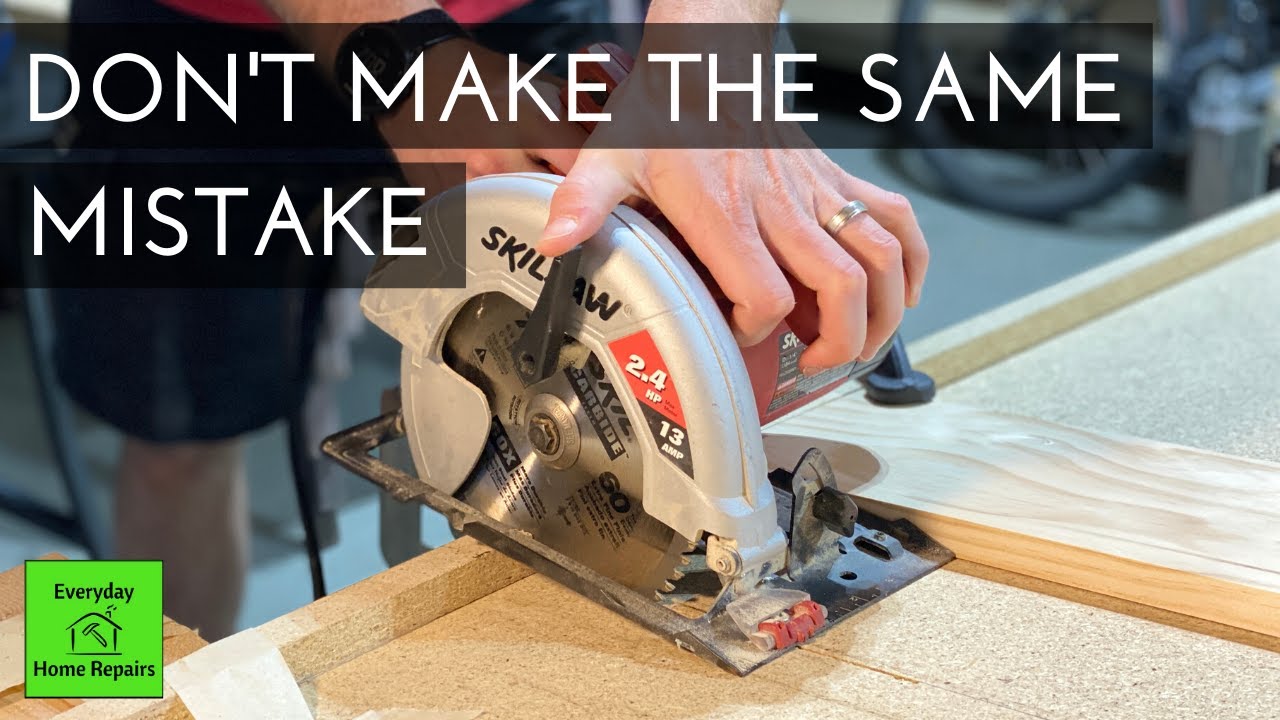
My first major mistake was trying to cut laminate countertops with basic household tools, which resulted in chipped edges and completely ruined surfaces. I quickly learned that investing in the right cutting tools makes all the difference between amateur and professional results. A fine-toothed circular saw blade specifically designed for laminate became my most important purchase, followed by a quality straightedge guide that ensured perfectly straight cuts every time.
Router bits designed for laminate trimming proved invaluable for achieving smooth, finished edges around sinks and corners. I initially tried using standard wood bits, but they caused excessive chipping and heat buildup that damaged the laminate surface. Carbide-tipped laminate bits cut cleanly through both the decorative surface and substrate without melting or chipping, producing edges that required minimal finishing work.
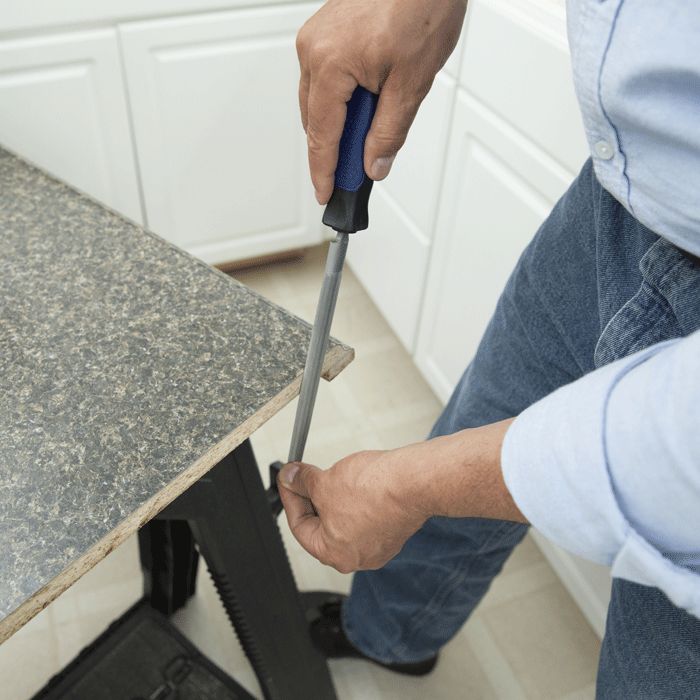
Measuring and marking tools became just as crucial as the cutting implements themselves. A good steel ruler, a sharp pencil, and a quality square prevented the measurement errors that plagued my early attempts. I also invested in masking tape to protect cut lines and reduce chipping, plus clamps to secure the countertop firmly during cutting. These seemingly minor tools made major differences in both safety and cut quality.
Preparation Techniques That Prevent Chipping and Damage
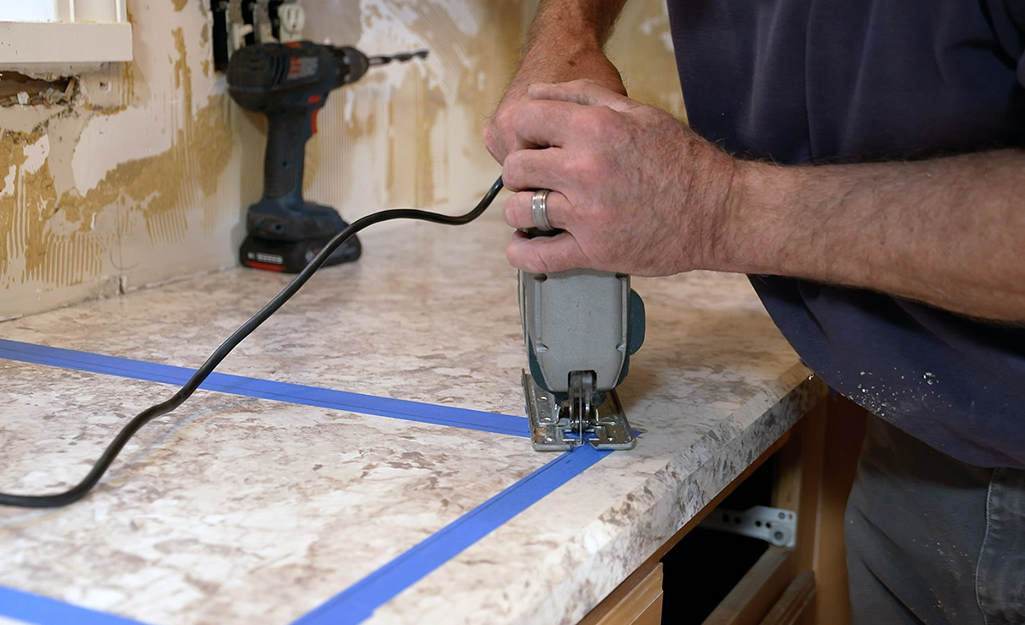
Proper surface preparation became my secret weapon for achieving clean cuts without the chipping that ruined my first attempts. I learned to apply painter’s tape along the cut line on both sides of the laminate, creating a protective barrier that prevents the blade from tearing the decorative surface. This simple step eliminated about 90% of the chipping issues that had frustrated me during my initial cutting attempts.
Supporting the laminate properly during cutting proved just as important as blade selection and surface preparation. I created a cutting station using sawhorses and plywood that supported the entire countertop surface, preventing vibration and flexing that can cause irregular cuts. Inadequate support was responsible for several of my early failures, where perfectly planned cuts went awry due to material movement during the cutting process.
Temperature considerations became another crucial factor I hadn’t initially appreciated. Cold laminate is more brittle and prone to chipping, so I learned to bring countertops to room temperature before cutting, especially during winter installations. I also discovered that cutting too quickly generates heat that can melt the laminate, creating rough, sealed edges that are difficult to finish properly. Patience and consistent feed rates produce much better results.
Mastering Different Types of Cuts: Straight, Curved, and Complex
Straight cuts seemed deceptively simple until I attempted my first long rip cut and watched the blade wander despite my careful setup. I learned that maintaining consistent pressure and feed rate is crucial for straight cuts, and that stopping mid-cut to reposition often creates visible lines in the finished edge. Using a quality fence system or a clamped straightedge guide eliminated these problems and gave me confidence to tackle longer cuts.
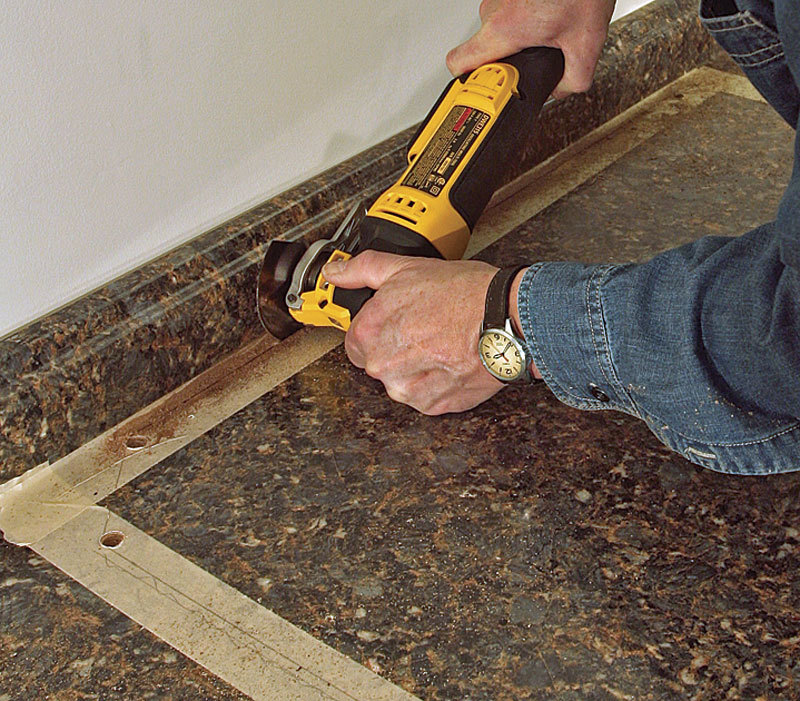
Curved cuts around sinks and corners presented entirely different challenges that required new techniques and tools. I discovered that making relief cuts perpendicular to the curve line allowed the waste material to break away cleanly without stressing the remaining laminate. Jigsaw work required ultra-fine blades and extremely slow cutting speeds to prevent chipping, plus careful attention to blade angle to maintain vertical cuts.
Complex cutouts for cooktops and undermount sinks demanded the most precision and planning. I learned to drill starter holes at each corner using appropriate bits, then carefully connect them with jigsaw cuts. Templates became essential for ensuring accuracy, and I developed the habit of making test cuts on scrap material before attempting final cuts on expensive countertops. This extra step prevented several costly mistakes.
Troubleshooting Common Cutting Problems and Mistakes
Blade selection mistakes caused most of my early cutting disasters, and I learned through expensive experience that not all fine-toothed blades work well with laminate. Blades designed for wood often have too much set in their teeth, causing excessive tear-out, while metal-cutting blades may not clear chips effectively. Laminate-specific blades with alternate top bevel teeth and negative hook angles produce the cleanest cuts with minimal chipping.
Feed rate errors created problems ranging from burn marks to rough cuts that required extensive sanding to repair. Cutting too slowly allows the blade to overheat and melt the laminate, while cutting too fast causes the blade to grab and tear the surface. I developed a feel for the right speed through practice, listening to the sound of the cut and watching for visual cues like smooth chip evacuation.
Measurement and layout errors proved the most expensive mistakes to fix, sometimes requiring the complete replacement of countertop sections. I learned to measure twice, cut once, and always add small amounts of material that can be trimmed away rather than trying to cut to exact final dimensions. Creating detailed paper templates for complex cuts prevented several potential disasters and gave me confidence in my layouts.
Safety Considerations and Workshop Setup for Laminate Cutting
Eye and respiratory protection became non-negotiable after my first few cutting sessions left me with irritated eyes and a dust-filled workshop. Laminate cutting produces fine particles that can be harmful if inhaled, and the potential for flying debris makes safety glasses essential. I invested in a good dust collection system that connects to my tools, dramatically improving air quality and visibility during cutting operations.
Workshop ventilation proved crucial not just for dust control but also for managing the fumes produced when cutting through laminate adhesives and substrates. I learned to position fans strategically to move contaminated air away from my work area while bringing in fresh air. Working outdoors when weather permits provides the best ventilation, though wind can affect cutting accuracy.
Fire prevention considerations became important when I learned that laminate dust is combustible and can create explosive conditions in enclosed spaces. I developed habits around tool maintenance, dust cleanup, and proper storage of materials that minimize fire risks. Keeping a fire extinguisher in the workshop provides peace of mind, though proper prevention through cleanliness and ventilation is much more important.
Finishing and Edge Treatment After Cutting
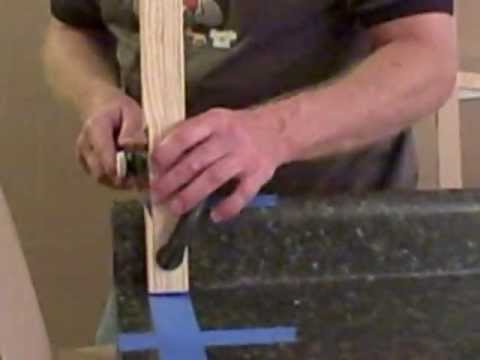
Edge finishing techniques can make the difference between amateur and professional-looking results, regardless of how clean the initial cuts were. I learned to use fine sandpaper to smooth any minor imperfections, working progressively through grits from 220 to 400 for the smoothest possible finish. Light sanding also helps remove any melted material that accumulated during cutting, creating better surfaces for edge banding or trim application.
Edge banding application became an art form requiring patience and attention to detail. I discovered that pre-heating the edge banding slightly improves adhesion and makes it more pliable for curved applications. A laminate roller ensures proper bonding without air bubbles, while a sharp utility knife trims excess material cleanly without pulling or tearing the banding away from the substrate.
Final inspection and touch-up work are completed on each cutting project and determine the overall quality of the finished installation. I developed systematic inspection routines that check for chipping, rough edges, proper fit, and alignment issues that need correction before final installation. Small problems caught at this stage are much easier to fix than issues discovered after countertops are permanently mounted.
Professional Installation, Integration, and Quality Control
Working with professional installers taught me about industry standards and expectations for cut quality that DIY enthusiasts should understand. Professionals expect cuts to be within 1/16 inch tolerance for most applications, with tighter tolerances for visible edges and joints. Understanding these standards helped me improve my own cutting accuracy and better communicate with contractors when necessary.
Quality control checkpoints throughout the cutting process prevent small errors from becoming major problems. I learned to measure and verify fit frequently rather than completing all cuts before testing any fits. This approach catches problems early when they’re easier to correct, rather than discovering issues after significant work is complete and correction options are limited.
Integration with other trades requires coordination and communication about cut tolerances, installation sequences, and access requirements. I learned to plan cutting schedules around plumbing and electrical work, leaving appropriate gaps for adjustments while maintaining proper fit and finish. Clear communication about expectations and timelines prevents conflicts and ensures smooth project completion.

What type of saw blade works best for cutting laminate countertops?
I use carbide-tipped blades specifically designed for laminate with 60-80 teeth and negative hook angles. These blades cut cleanly without chipping. Wood blades cause tear-out, while metal blades don’t clear chips well. I replace blades when they start leaving rough cuts or require excessive pressure. Quality laminate blades cost more but produce dramatically better results and last longer than cheaper alternatives.
How do you prevent chipping when cutting laminate?
Painter’s tape along the cut line is my most effective technique, applied to both sides of the laminate. I also use sharp, appropriate blades, cut with the decorative side up when using circular saws, and maintain steady feed rates. Proper support prevents vibration that causes chipping. These techniques eliminated 95% of the chipping problems I experienced as a beginner.

Can you cut laminate countertops after they’re installed?
Yes, but it’s much more challenging and risky. I’ve made minor trim cuts on installed countertops using oscillating tools and careful masking. However, major cuts risk damaging cabinets, walls, or plumbing. It’s always better to cut before installation when possible. If post-installation cutting is necessary, I protect surrounding surfaces extensively and use tools that minimize vibration and debris.
What’s the hardest type of cut to make in laminate countertops?
Curved cutouts for undermount sinks are the most challenging cuts I’ve tackled. They require precise templates, careful drilling of relief holes, slow jigsaw work, and extensive finishing. The combination of tight tolerances, visible results, and difficulty correcting mistakes makes these cuts nerve-wracking. I always practice on scrap material and use templates to ensure accuracy before cutting expensive countertops.
How do you cut laminate without the right tools?
While proper tools produce better results, I’ve made emergency cuts with fine-toothed hand saws, utility knives for scoring, and even careful work with angle grinders. The key is taking time, using sharp blades, and accepting that results won’t match professional equipment. However, for important projects, renting or buying proper tools is worth the investment in time savings and quality results.
What mistakes should beginners absolutely avoid when cutting laminate?
Don’t cut without proper blade support, use dull or inappropriate blades, or rush the cutting process. Measuring errors are expensive and frustrating to fix. I learned to double-check all measurements, make test cuts on scraps, and plan cut sequences carefully. Taking shortcuts on preparation or safety creates problems that cost much more time and money than doing things right initially.

Related articles: