Installing a granite countertop can transform your kitchen or bathroom into a sophisticated and elegant space. While professional installation can be costly, taking on a DIY granite countertop installation project can save you money and provide a sense of accomplishment. This comprehensive guide covers all aspects of DIY granite countertop installation, from planning and preparation to cutting, fitting, and finishing.
Planning Your Granite Countertop Installation
Proper planning is essential to the success of a DIY granite countertop installation. This stage involves measuring, selecting the right granite slab, and preparing your workspace.
Measuring Your Space: Start by measuring the dimensions of your current countertop space accurately. Use a tape measure to get the length and width of each section. Don’t forget to measure the depth and any overhangs you want. Create a detailed sketch with these measurements, including the location of sinks, appliances, and any corners or curves.
Selecting Your Granite Slab: Choosing the right granite slab is crucial. Visit a granite supplier to see a variety of options in person. Consider the color, pattern, and thickness of the slabs. Ensure the slab you choose is large enough to cover your entire countertop without too many seams. Granite slabs typically come in standard sizes, but custom options are also available.

Preparing the Workspace: Clear your kitchen or bathroom of any items on or around the existing countertops. Remove any old countertops, and prepare the base cabinets for the new installation. Ensure that the cabinets are level and structurally sound to support the weight of the granite.
Gathering Tools and Materials: Assemble all the necessary tools and materials before you begin. Essential tools include a circular saw with a diamond blade, a wet saw, an angle grinder, a level, clamps, and silicone adhesive. You will also need a measuring tape, safety gear, and a helper for lifting the heavy slabs.
Planning for Cutouts: If your countertop will include a sink, cooktop, or other fixtures, plan for these cutouts. Measure and mark their positions on your sketch. Ensure that you have the right tools and templates to make precise cuts in the granite slab.
Budgeting for Your Project: A DIY granite countertop installation can save you money, but it still requires a budget. Consider the cost of the granite slab, tools, materials, and any additional support you might need. Set aside a contingency fund for unexpected expenses.
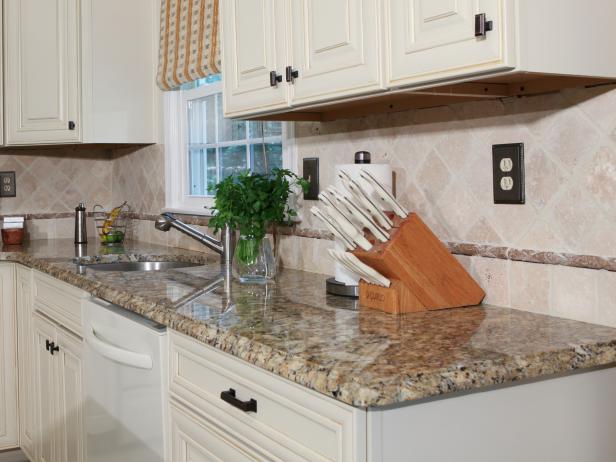
Choosing the Right Granite
Granite is available in a wide range of colors, patterns, and finishes. Choosing the right granite for your countertop involves considering both aesthetic and practical factors.
- Color and Pattern: Granite comes in various colors, from classic whites and blacks to exotic blues and greens. The pattern can be speckled, marbled, or veined. Choose a color and pattern that complement your kitchen or bathroom design. Consider how the granite will look with your cabinets, flooring, and backsplash.
- Finish Options: Granite can be finished in several ways. The most common finishes are polished, honed, and leathered. A polished finish is glossy and reflective, while a honed finish is smooth but matte. A leathered finish has a textured, slightly rough surface. Each finish offers a different look and feel, so choose one that suits your style and maintenance preferences.
- Thickness: Granite slabs typically come in 2cm or 3cm thicknesses. Thicker slabs are more durable and have a more substantial appearance. However, they are also heavier and more challenging to handle. Thinner slabs may require additional support but are easier to work with for DIY projects.
- Edge Profiles: The edge profile of your granite countertop can enhance its overall look. Common edge profiles include straight, beveled, bullnose, and ogee. Some profiles are more intricate and require specialized tools to create. Consider both the aesthetic appeal and the practical implications of the edge profile you choose.
- Quality and Grade: Granite is graded based on its quality, which affects its price. High-grade granite is more consistent in color and pattern and has fewer natural imperfections. Lower-grade granite may have more variations and imperfections but can be more affordable. Inspect the slab carefully and choose a grade that fits your budget and quality expectations.
- Sourcing Granite: When sourcing granite, visit multiple suppliers to compare options. Ask about the origin of the granite and its durability. Check for any cracks, fissures, or weak spots in the slab. Reputable suppliers will provide detailed information about the granite and offer support for your DIY project.
Preparing for Installation
Before installing your granite countertop, proper preparation is essential to ensure a smooth and successful process.
Removing Old Countertops: Start by removing your existing countertops. Use a utility knife to cut through any caulking or adhesive, and gently pry the countertops away from the cabinets. Be careful not to damage the cabinets during removal.
Ensuring Level Cabinets: Check that your base cabinets are level and sturdy. Use a level to ensure the cabinets are even. If necessary, add shims to level the cabinets. Secure any loose cabinets to the wall to provide a stable base for the granite.
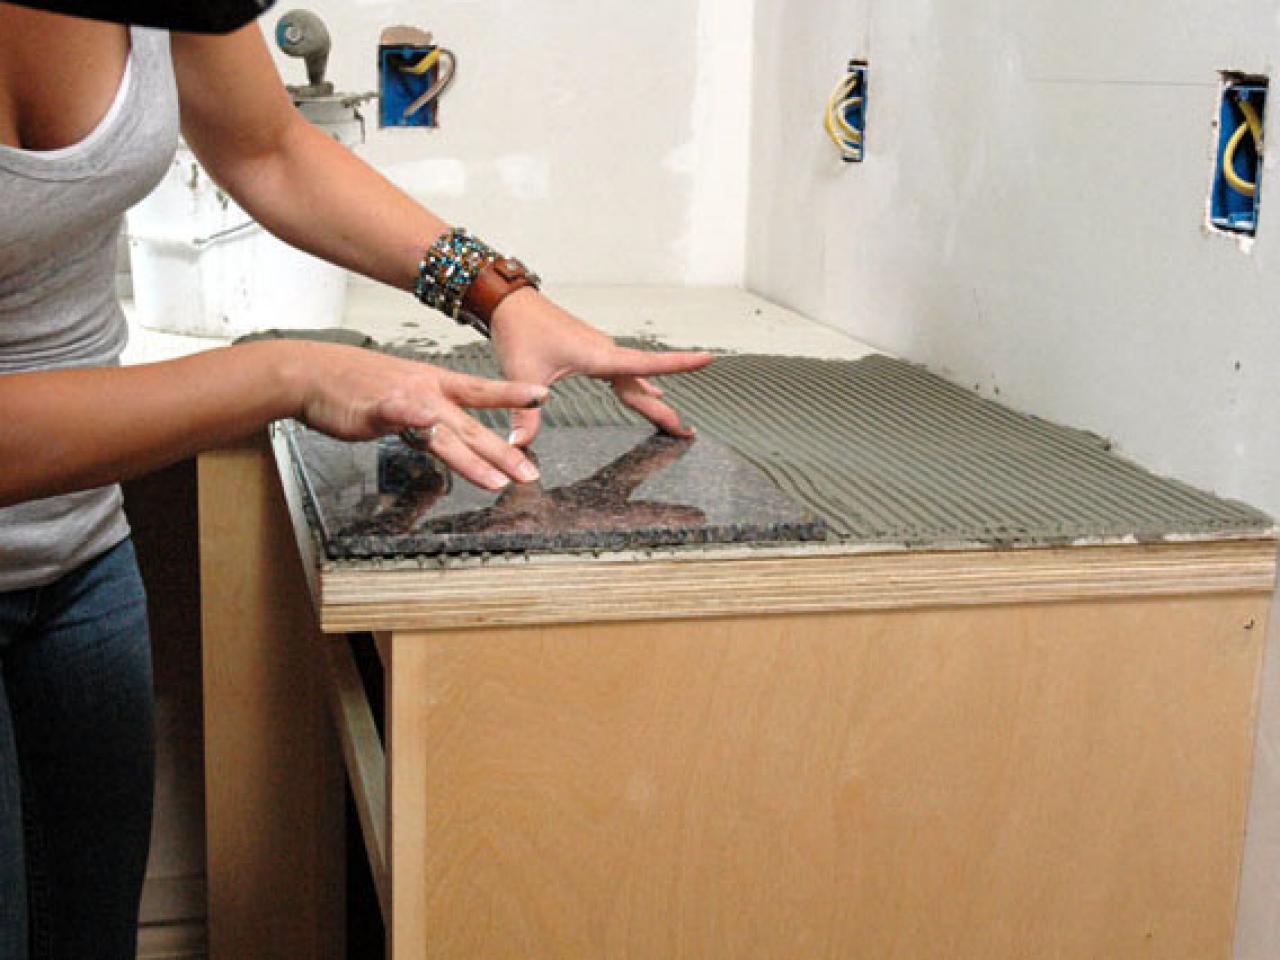
Installing Plywood Base: For added support, install a plywood base on top of the cabinets. This base will help distribute the weight of the granite evenly. Cut the plywood to fit the cabinet dimensions and secure it with screws. Ensure the plywood is level and flush with the cabinet edges.
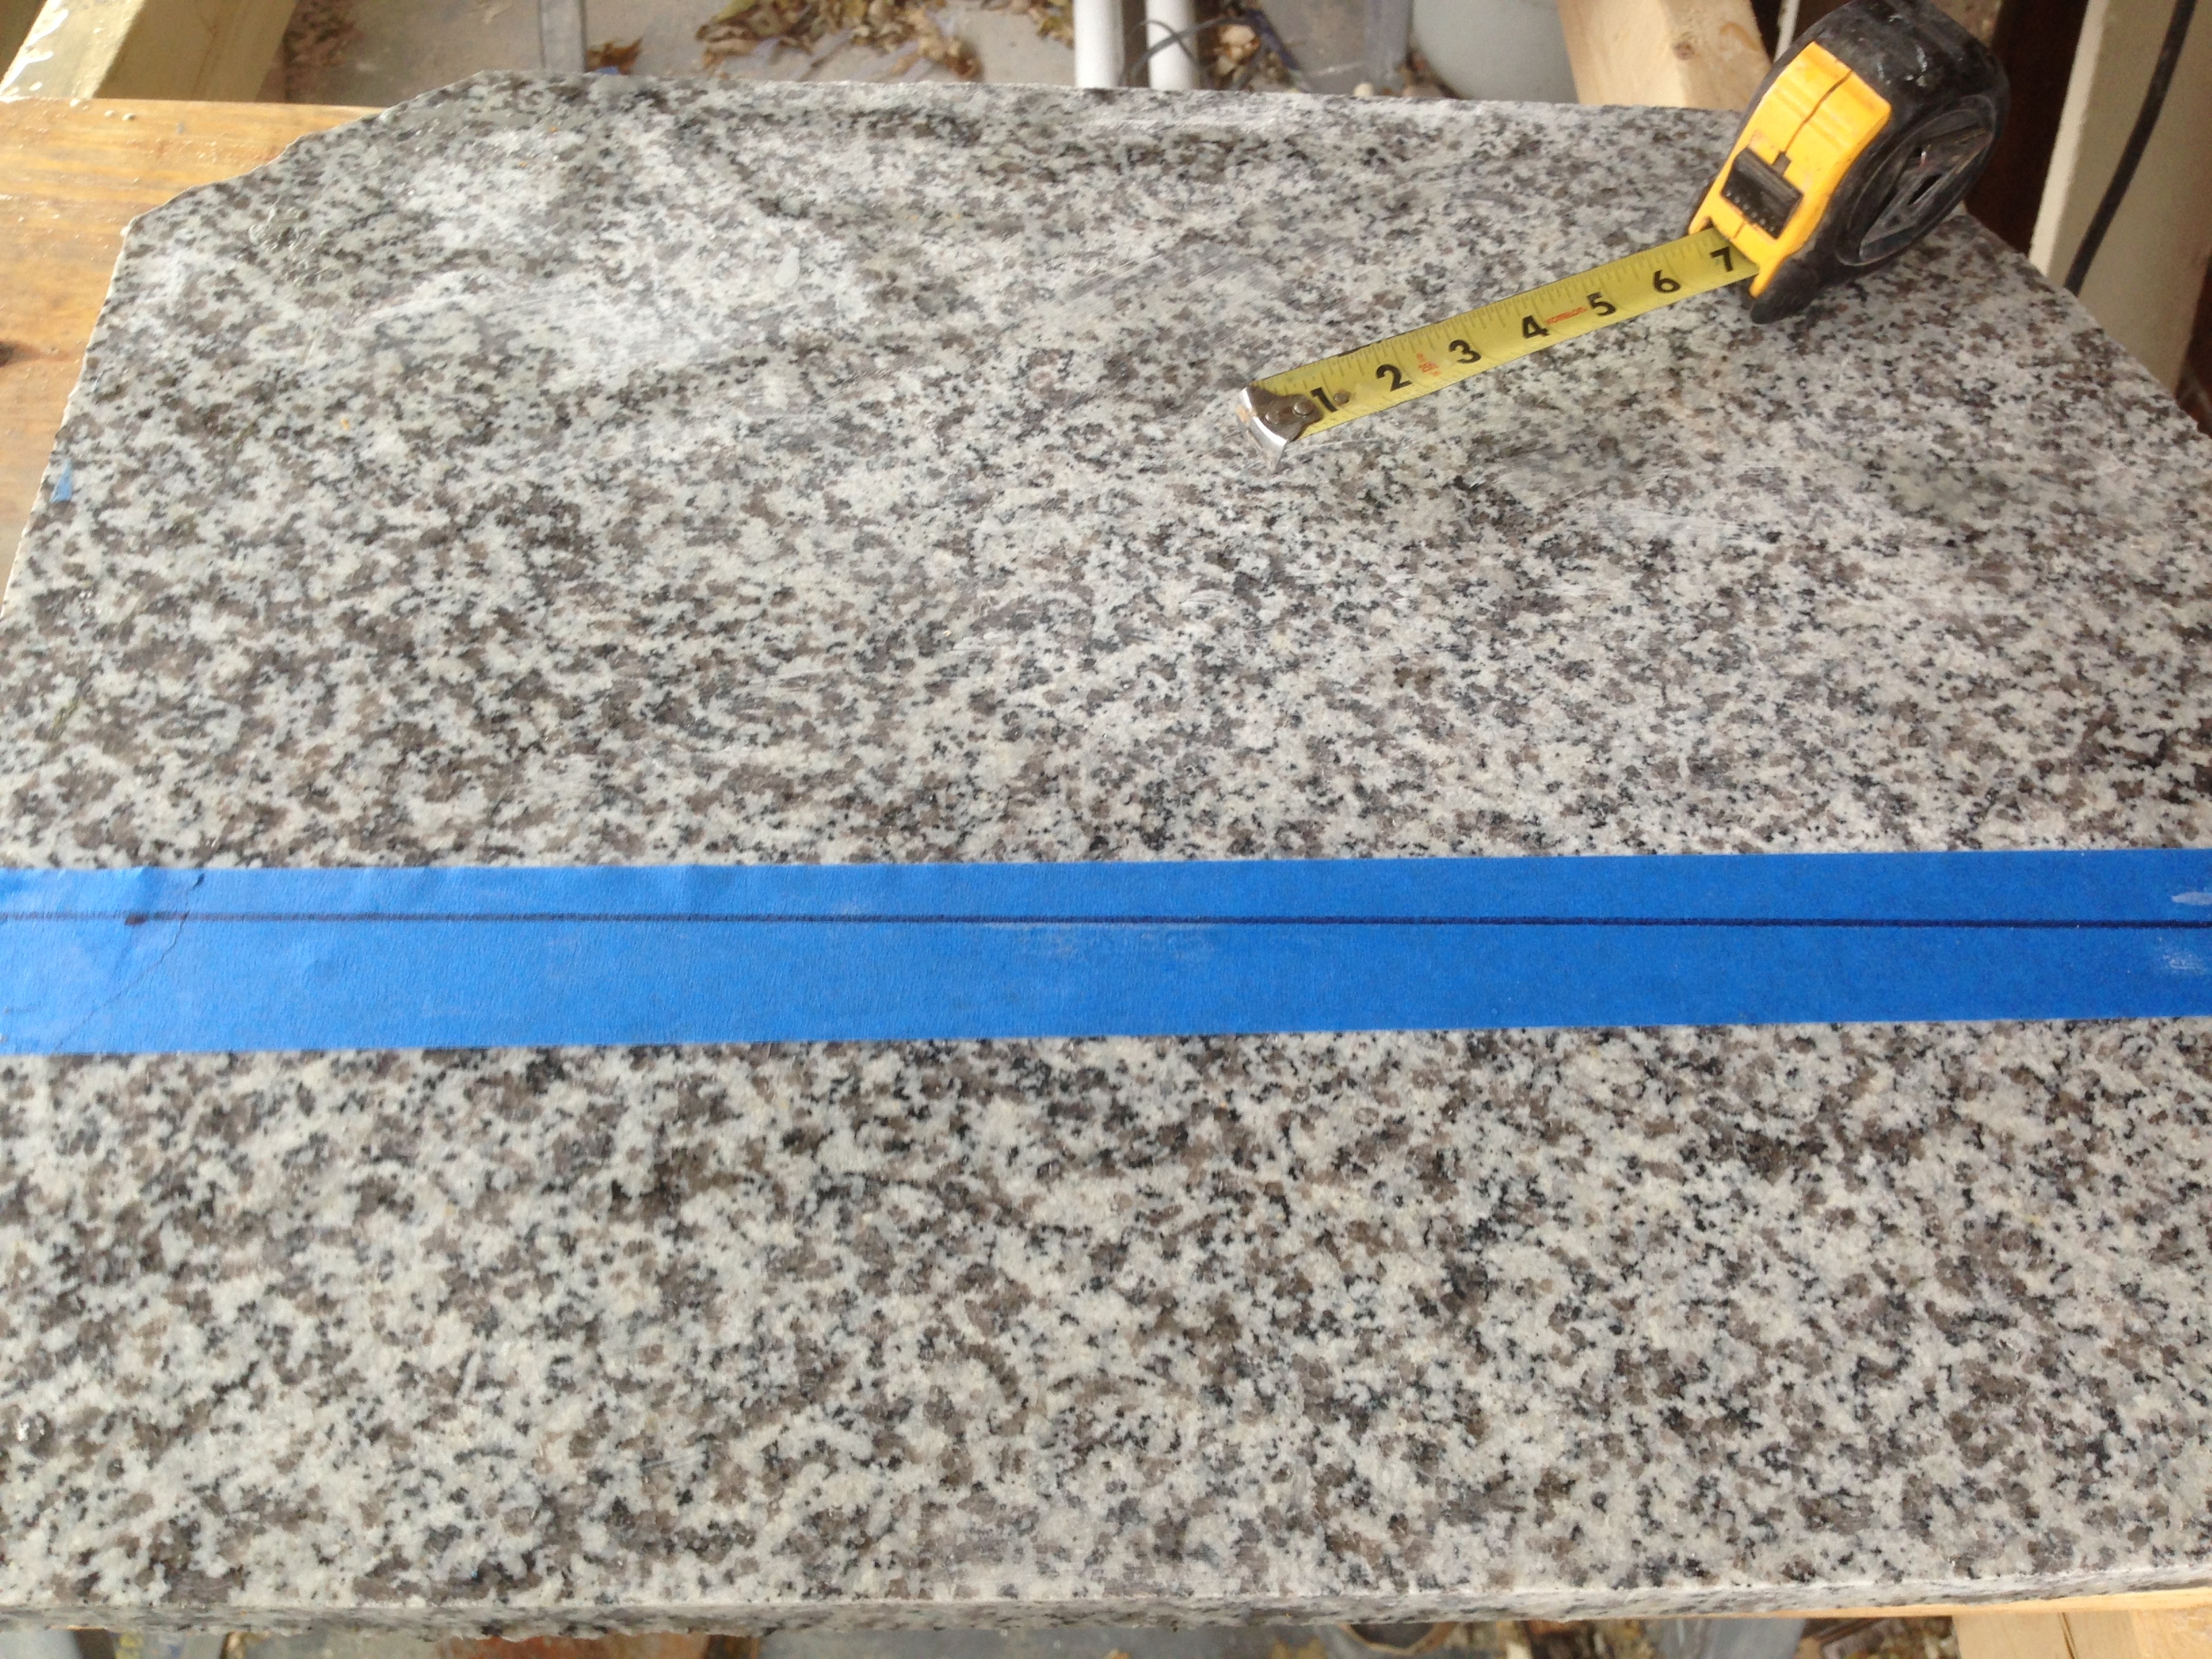
Creating a Template: Create a template of your countertop using cardboard or thin plywood. This template will help you cut the granite slab accurately. Include cutouts for sinks, cooktops, and any other fixtures. Double-check all measurements to ensure accuracy.
Marking the Granite: Transfer the template measurements onto the granite slab. Use a straight edge and a pencil to mark the cuts. Be precise and take your time to ensure all markings are accurate. Mistakes at this stage can be costly.
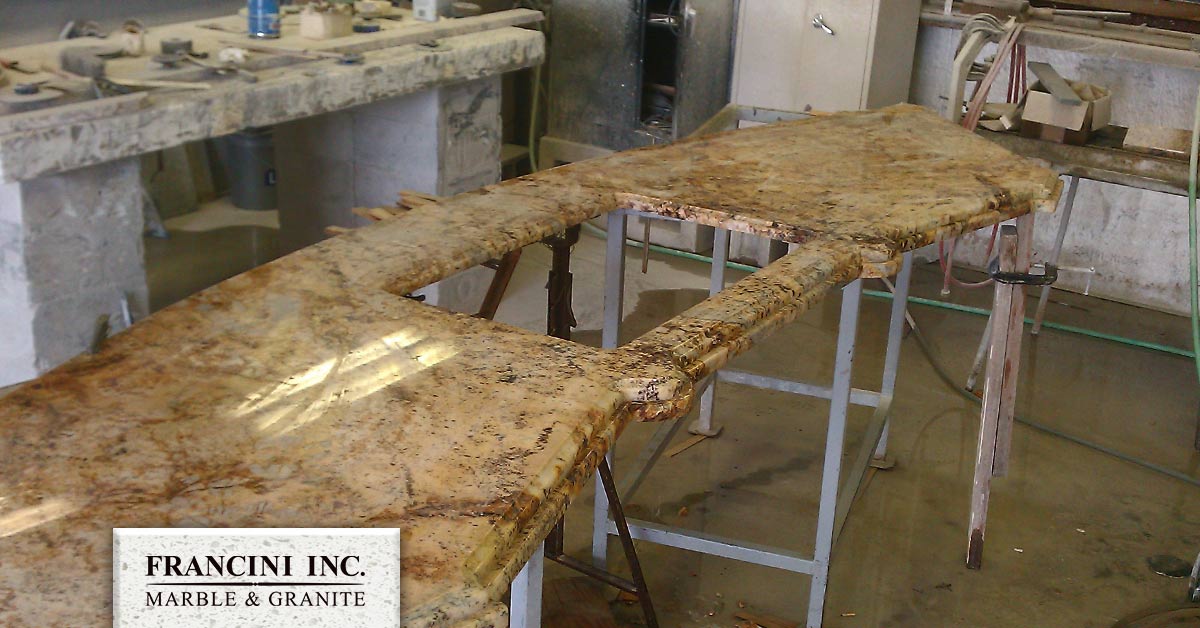
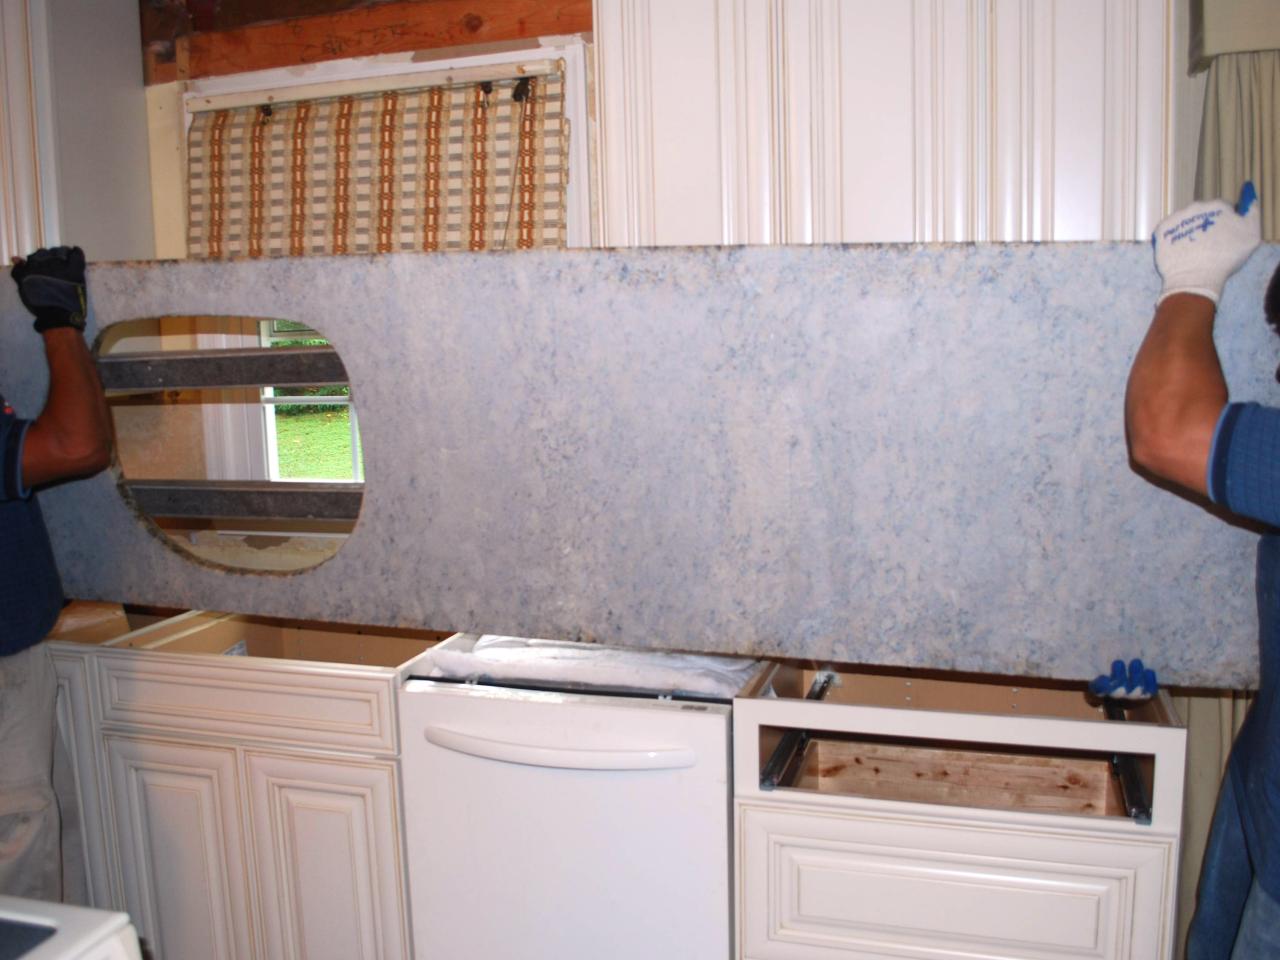
Safety Precautions: Granite is heavy and requires careful handling. Wear safety gear, including gloves, goggles, and a dust mask. Work with a partner to lift and move the granite slab. Use clamps to secure the slab during cutting to prevent accidents.
Cutting and Fitting the Granite
Cutting and fitting the granite slab are critical steps in the installation process. Precision and attention to detail are essential to achieving a professional result.
Cutting the Granite: Use a circular saw with a diamond blade to make straight cuts along the marked lines. For curved cuts or cutouts, use a wet saw or an angle grinder with a diamond blade. Make several shallow passes rather than a single deep cut to avoid cracking the granite.
Smoothing the Edges: After cutting the granite, smooth the edges with an angle grinder fitted with a diamond polishing pad. Work your way through different grit levels, starting with a coarse grit and finishing with a fine grit. This step will give the edges a smooth, polished appearance.
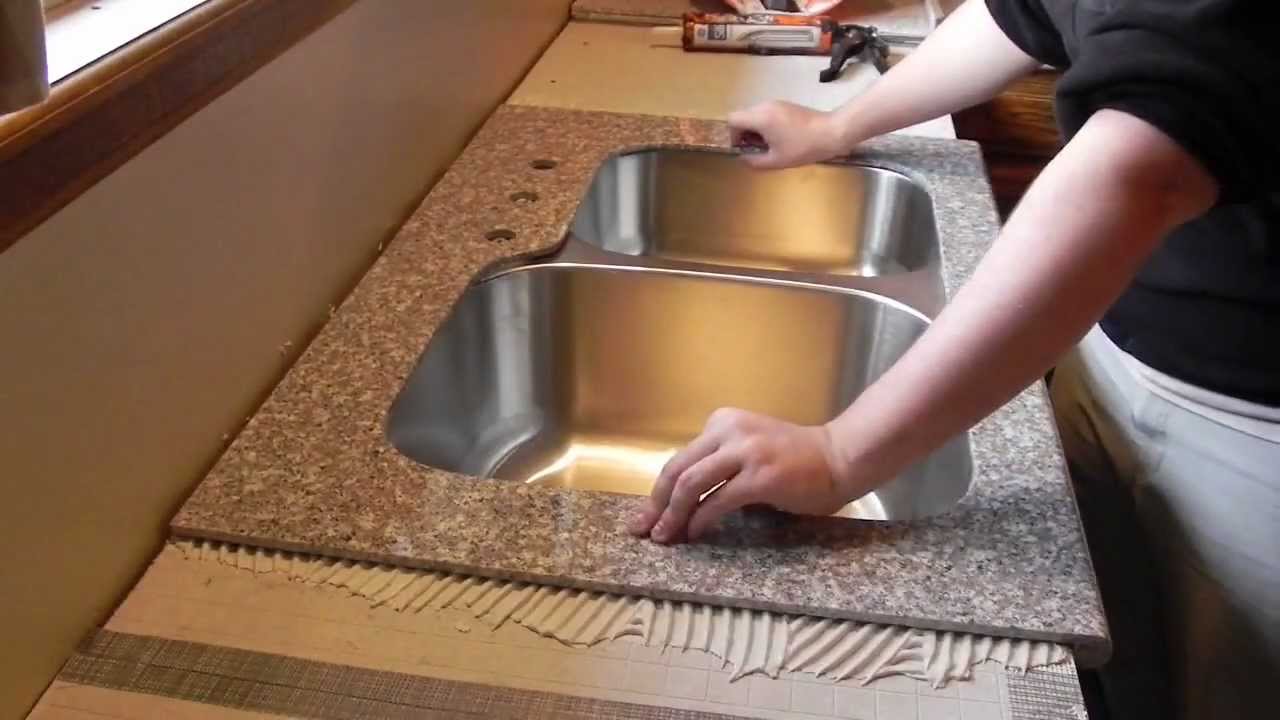
Creating Cutouts: For sink or cooktop cutouts, drill pilot holes at each corner of the cutout area. Use a jigsaw with a diamond blade to cut along the marked lines. Take your time to ensure the cutouts are precise and clean.
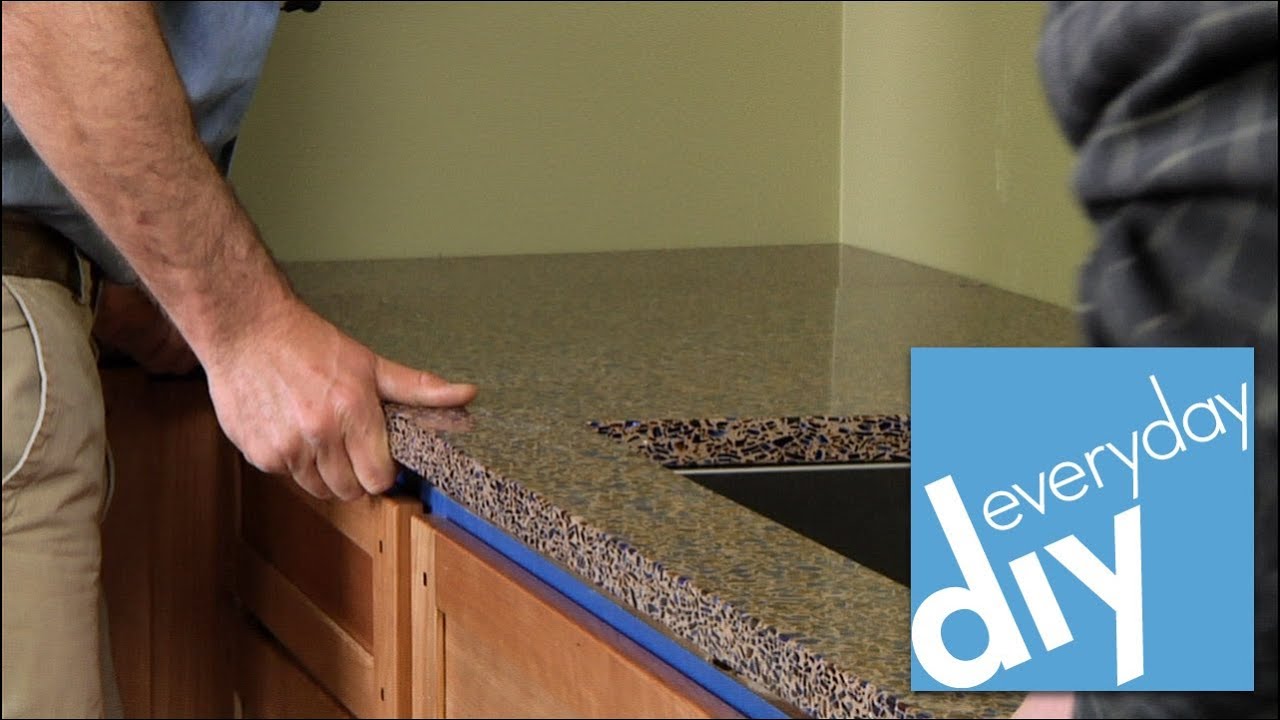
Dry Fitting the Slab: Before securing the granite, perform a dry fit to check the alignment and fit. Place the granite slabs on the cabinets and adjust as needed. Ensure that all seams are tight and that the edges are flush with the cabinets.
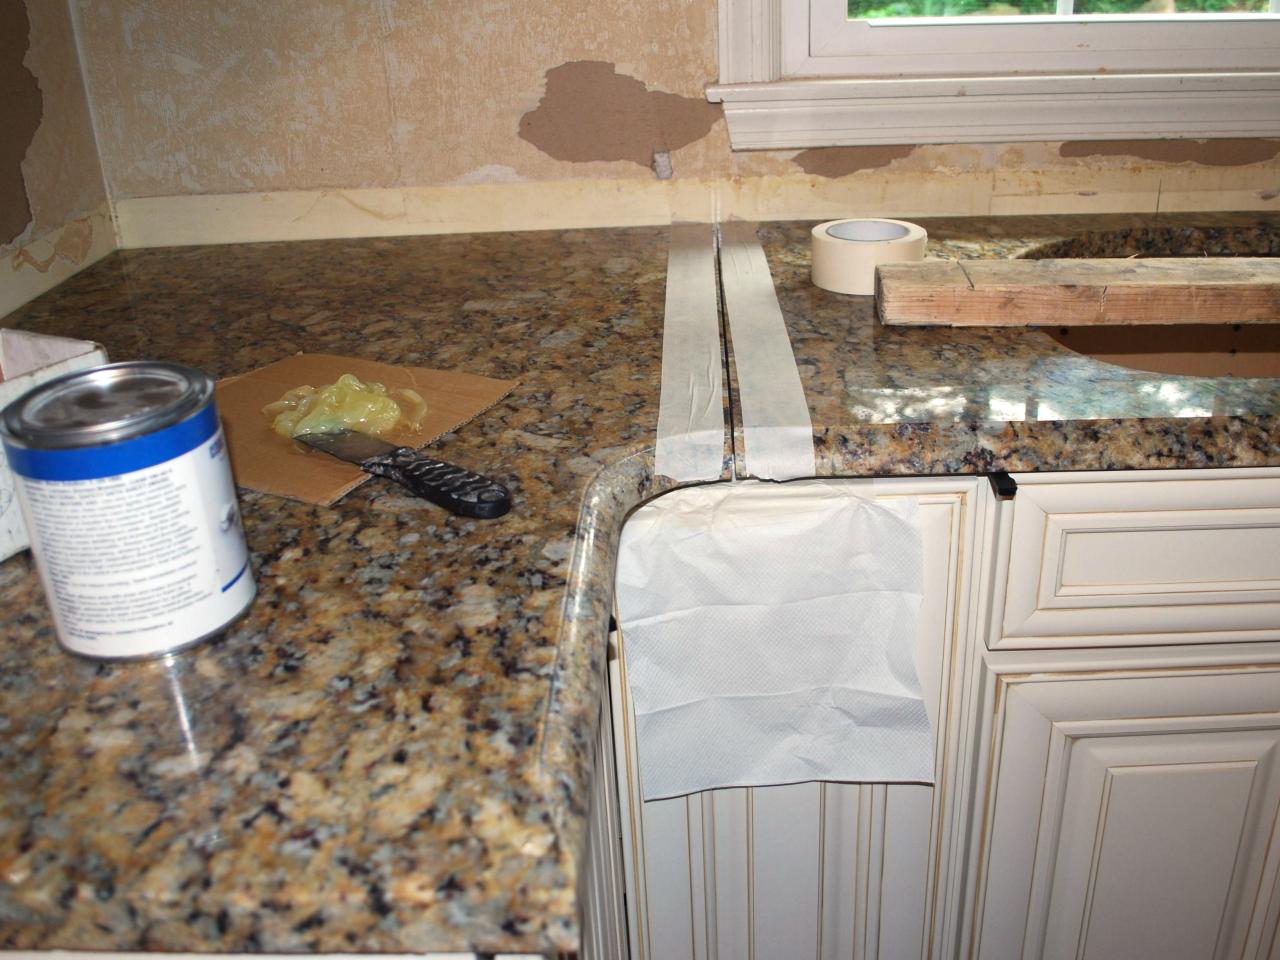
Joining Seams: If your countertop requires multiple slabs, join the seams using epoxy or a specialized seam adhesive. Mix the epoxy according to the manufacturer’s instructions and apply it to the seam. Use a seam setter tool to pull the slabs together tightly until the epoxy cures.
Securing the Granite: Once you are satisfied with the fit, secure the granite to the cabinets. Apply silicone adhesive along the top edges of the cabinets and place the granite slabs on top. Press down gently to ensure good contact. Use shims as needed to level the slabs.
Sealing and Finishing the Countertop
Proper sealing and finishing protect your granite countertop and enhance its appearance. This step is crucial for durability and maintenance.
Cleaning the Surface: Before sealing, clean the countertop thoroughly to remove any dust or debris. Use a granite cleaner or a mixture of mild soap and water. Rinse well and allow the surface to dry completely.
Applying the Sealer: Choose a granite sealer that is suitable for your specific type of granite. Apply the sealer according to the manufacturer’s instructions, using a clean cloth or sponge. Work in small sections, ensuring even coverage. Allow the sealer to penetrate for the recommended time before wiping off any excess.
Polishing the Granite: After sealing, polish the granite to enhance its shine and luster. Use a granite polish and a soft cloth, buffing the surface in circular motions. Polishing not only improves the appearance but also adds an extra layer of protection.
Caulking the Edges: Apply silicone caulk along the edges where the granite meets the backsplash, sink, or walls. This step prevents water from seeping under the countertop and causing damage. Use a caulk smoothing tool or your finger to create a smooth, even bead.
Inspecting the Finished Countertop: Inspect the entire countertop for any imperfections or areas that need touch-ups. Check the seams, edges, and cutouts to ensure everything is secure and properly finished. Address any issues promptly to prevent future problems.
Maintaining the Granite: Granite countertops require regular maintenance to keep them looking their best. Clean the surface daily with a granite cleaner or mild soap and water. Reseal the countertop periodically, as recommended by the sealer manufacturer, to maintain its protective barrier.
Common Mistakes to Avoid
Avoiding common mistakes can make the difference between a successful DIY project and one that requires costly repairs.
Incorrect Measurements: Inaccurate measurements can lead to improperly fitting slabs. Double-check all measurements and use a detailed template to ensure accuracy.
Choosing the Wrong Tools: Using the wrong tools can damage the granite and result in a poor finish. Invest in high-quality tools designed for cutting and polishing granite.
Inadequate Support: Failing to provide adequate support for the granite can lead to cracks and damage. Ensure your cabinets are level and sturdy, and consider adding a plywood base.
Skipping the Dry Fit: Skipping the dry fit can result in misaligned slabs and visible seams. Always perform a dry fit to check the alignment and make adjustments before securing the granite.
Improper Sealing: Failing to seal the granite properly can lead to stains and damage. Apply the sealer evenly and reapply as needed to maintain protection.
Rushing the Process: Granite installation requires patience and attention to detail. Rushing through the steps can result in mistakes and a subpar finish. Take your time to ensure each step is completed correctly.
What are the best tools for cutting granite countertops?
The best tools for cutting granite countertops include a circular saw with a diamond blade for straight cuts, a wet saw for curved cuts, and an angle grinder with a diamond polishing pad for smoothing edges. These tools are designed to handle the hardness of granite and provide precise, clean cuts.
How do I ensure my granite countertop is level?
To ensure your granite countertop is level, start by checking that your base cabinets are level and sturdy. Use a level tool to check for any uneven areas. If necessary, add shims to level the cabinets. During installation, use a level to check the granite slabs and adjust as needed to ensure a flat, even surface.
Can I install granite countertops over existing countertops?
Installing granite countertops over existing countertops is not recommended. The added weight of the granite can strain the existing structure and lead to potential damage. It is best to remove the old countertops and prepare the base cabinets properly to support the granite.
How often should I reseal my granite countertop?
The frequency of resealing depends on the type of granite and the sealer used. Generally, granite countertops should be resealed every 1-3 years. To test if your countertop needs resealing, sprinkle a few drops of water on the surface. If the water soaks in rather than beading up, it is time to reseal.
What is the cost of a DIY granite countertop installation?
The cost of a DIY granite countertop installation varies depending on the size of the countertop, the type of granite chosen, and the tools and materials needed. On average, DIY installation can cost between $50 to $100 per square foot, significantly less than professional installation. However, it is important to budget for additional expenses such as tools, adhesives, and sealers.
How to Install a Granite Kitchen Countertop
Related articles:
- Granite Countertop Color Selection
- DIY Granite Countertop Installation
- Black Granite Countertops Utah
- Do White Granite Countertops Stain?
- Blue Pearl Granite Countertop Pictures
- Steam Cleaning Granite Countertops
- Cutting Prefab Granite Countertops
- Granite Countertop Maintenance Tips
- DIY Faux Granite Countertop Kits
- How To Clean Granite Countertops?