Creating a concrete countertop with an integrated sink is a rewarding project that combines functionality with custom design. The process involves several stages, each requiring attention to detail to ensure a durable and attractive final product. To start, the first step is planning and designing your countertop. This includes measuring your kitchen or bathroom space accurately and deciding on the dimensions and shape of the countertop and sink. Sketching a detailed plan will help you visualize the final product and make necessary adjustments before beginning the actual work. Additionally, determining the thickness of the countertop and the sink design, whether it’s an undermount, drop-in, or integral sink, is crucial.
Once the design is finalized, constructing the mold is the next phase. A well-built mold ensures the concrete sets properly and matches your design specifications. Plywood or melamine-coated particleboard is commonly used for making molds because it provides a smooth surface for the concrete. The mold should be carefully assembled, with attention to making tight seams to prevent concrete from leaking. To create the sink cavity, use foam or a similar material to form the sink shape within the mold. Reinforcement is another critical consideration at this stage. Adding steel rebar or wire mesh within the mold provides the necessary strength to the countertop, especially in areas around the sink where stress is higher.
Mixing the concrete is the subsequent step, and it’s essential to use a high-quality concrete mix designed for countertops. These mixes typically include additives that enhance strength and workability. When mixing, follow the manufacturer’s instructions precisely to achieve the right consistency. A concrete mixer or a sturdy drill with a mixing attachment can help blend the ingredients thoroughly. Pouring the concrete into the mold should be done carefully to avoid air pockets, which can weaken the structure. Using a trowel, spread the concrete evenly and ensure it fills all corners and the sink cavity. Vibrating the mold by tapping its sides or using a concrete vibrator helps eliminate air bubbles and settle the concrete.
After pouring, the concrete needs to cure properly to achieve maximum strength. Covering the mold with plastic sheeting helps retain moisture during the curing process, which typically takes about 24 to 48 hours. During this period, it’s important to keep the mold undisturbed to prevent any deformation. Once the concrete has cured, carefully remove the mold. This step requires patience and precision to avoid damaging the concrete. Gently pry away the mold components, starting with the sides and then the base. If any edges are rough, use sandpaper or a concrete grinder to smooth them out.
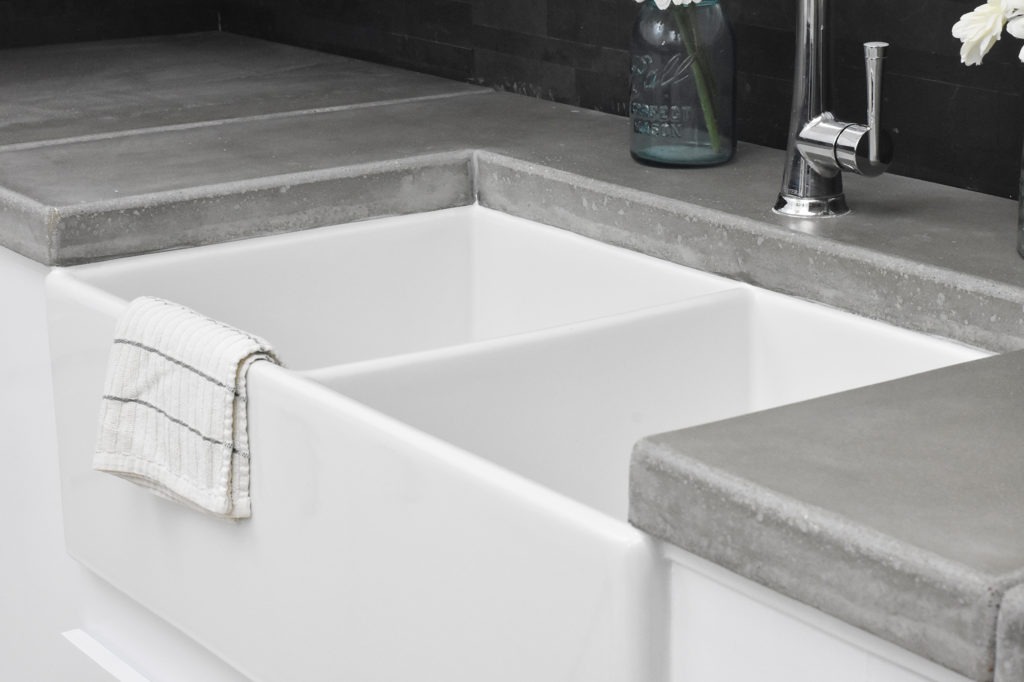
Finishing the concrete surface involves several stages. Initial sanding with coarse-grit sandpaper helps remove any imperfections and exposes the aggregate for a more decorative look. Gradually progress to finer grits for a smoother finish. Polishing the surface with a concrete polisher can enhance the appearance, giving it a glossy sheen. Sealing the countertop is crucial to protect it from stains and moisture. Choose a high-quality concrete sealer suitable for kitchen or bathroom use. Apply the sealer in thin, even coats, allowing each coat to dry completely before applying the next. This process not only enhances the durability of the countertop but also makes it easier to clean.
Installing the concrete countertop with an integrated sink involves several steps to ensure a secure and functional fit. First, check that the supporting cabinets are level and sturdy. Applying a bead of silicone caulk around the top edges of the cabinets creates a seal that prevents water from seeping underneath. Carefully place the countertop onto the cabinets, making sure it aligns perfectly with the walls and any cutouts for plumbing fixtures. Secure the countertop using screws or brackets if necessary, but avoid over-tightening to prevent cracks.
Connecting the sink to the plumbing is the final installation step. Depending on the sink design, this might involve attaching a drain assembly, installing faucets, and connecting water supply lines. Make sure all connections are tight and free from leaks. Testing the plumbing thoroughly before using the sink ensures everything functions correctly. Additionally, applying a final bead of silicone around the sink edges and any seams provides an extra layer of protection against water damage.

Maintaining a concrete countertop is relatively straightforward but requires some care to keep it looking its best. Regular cleaning with a mild soap and water solution is usually sufficient. Avoid using harsh chemicals or abrasive cleaners that can damage the sealer. Periodically resealing the countertop, typically once a year, helps maintain its protective layer and appearance. If any stains occur, addressing them promptly with appropriate cleaning methods is crucial to prevent them from becoming permanent.
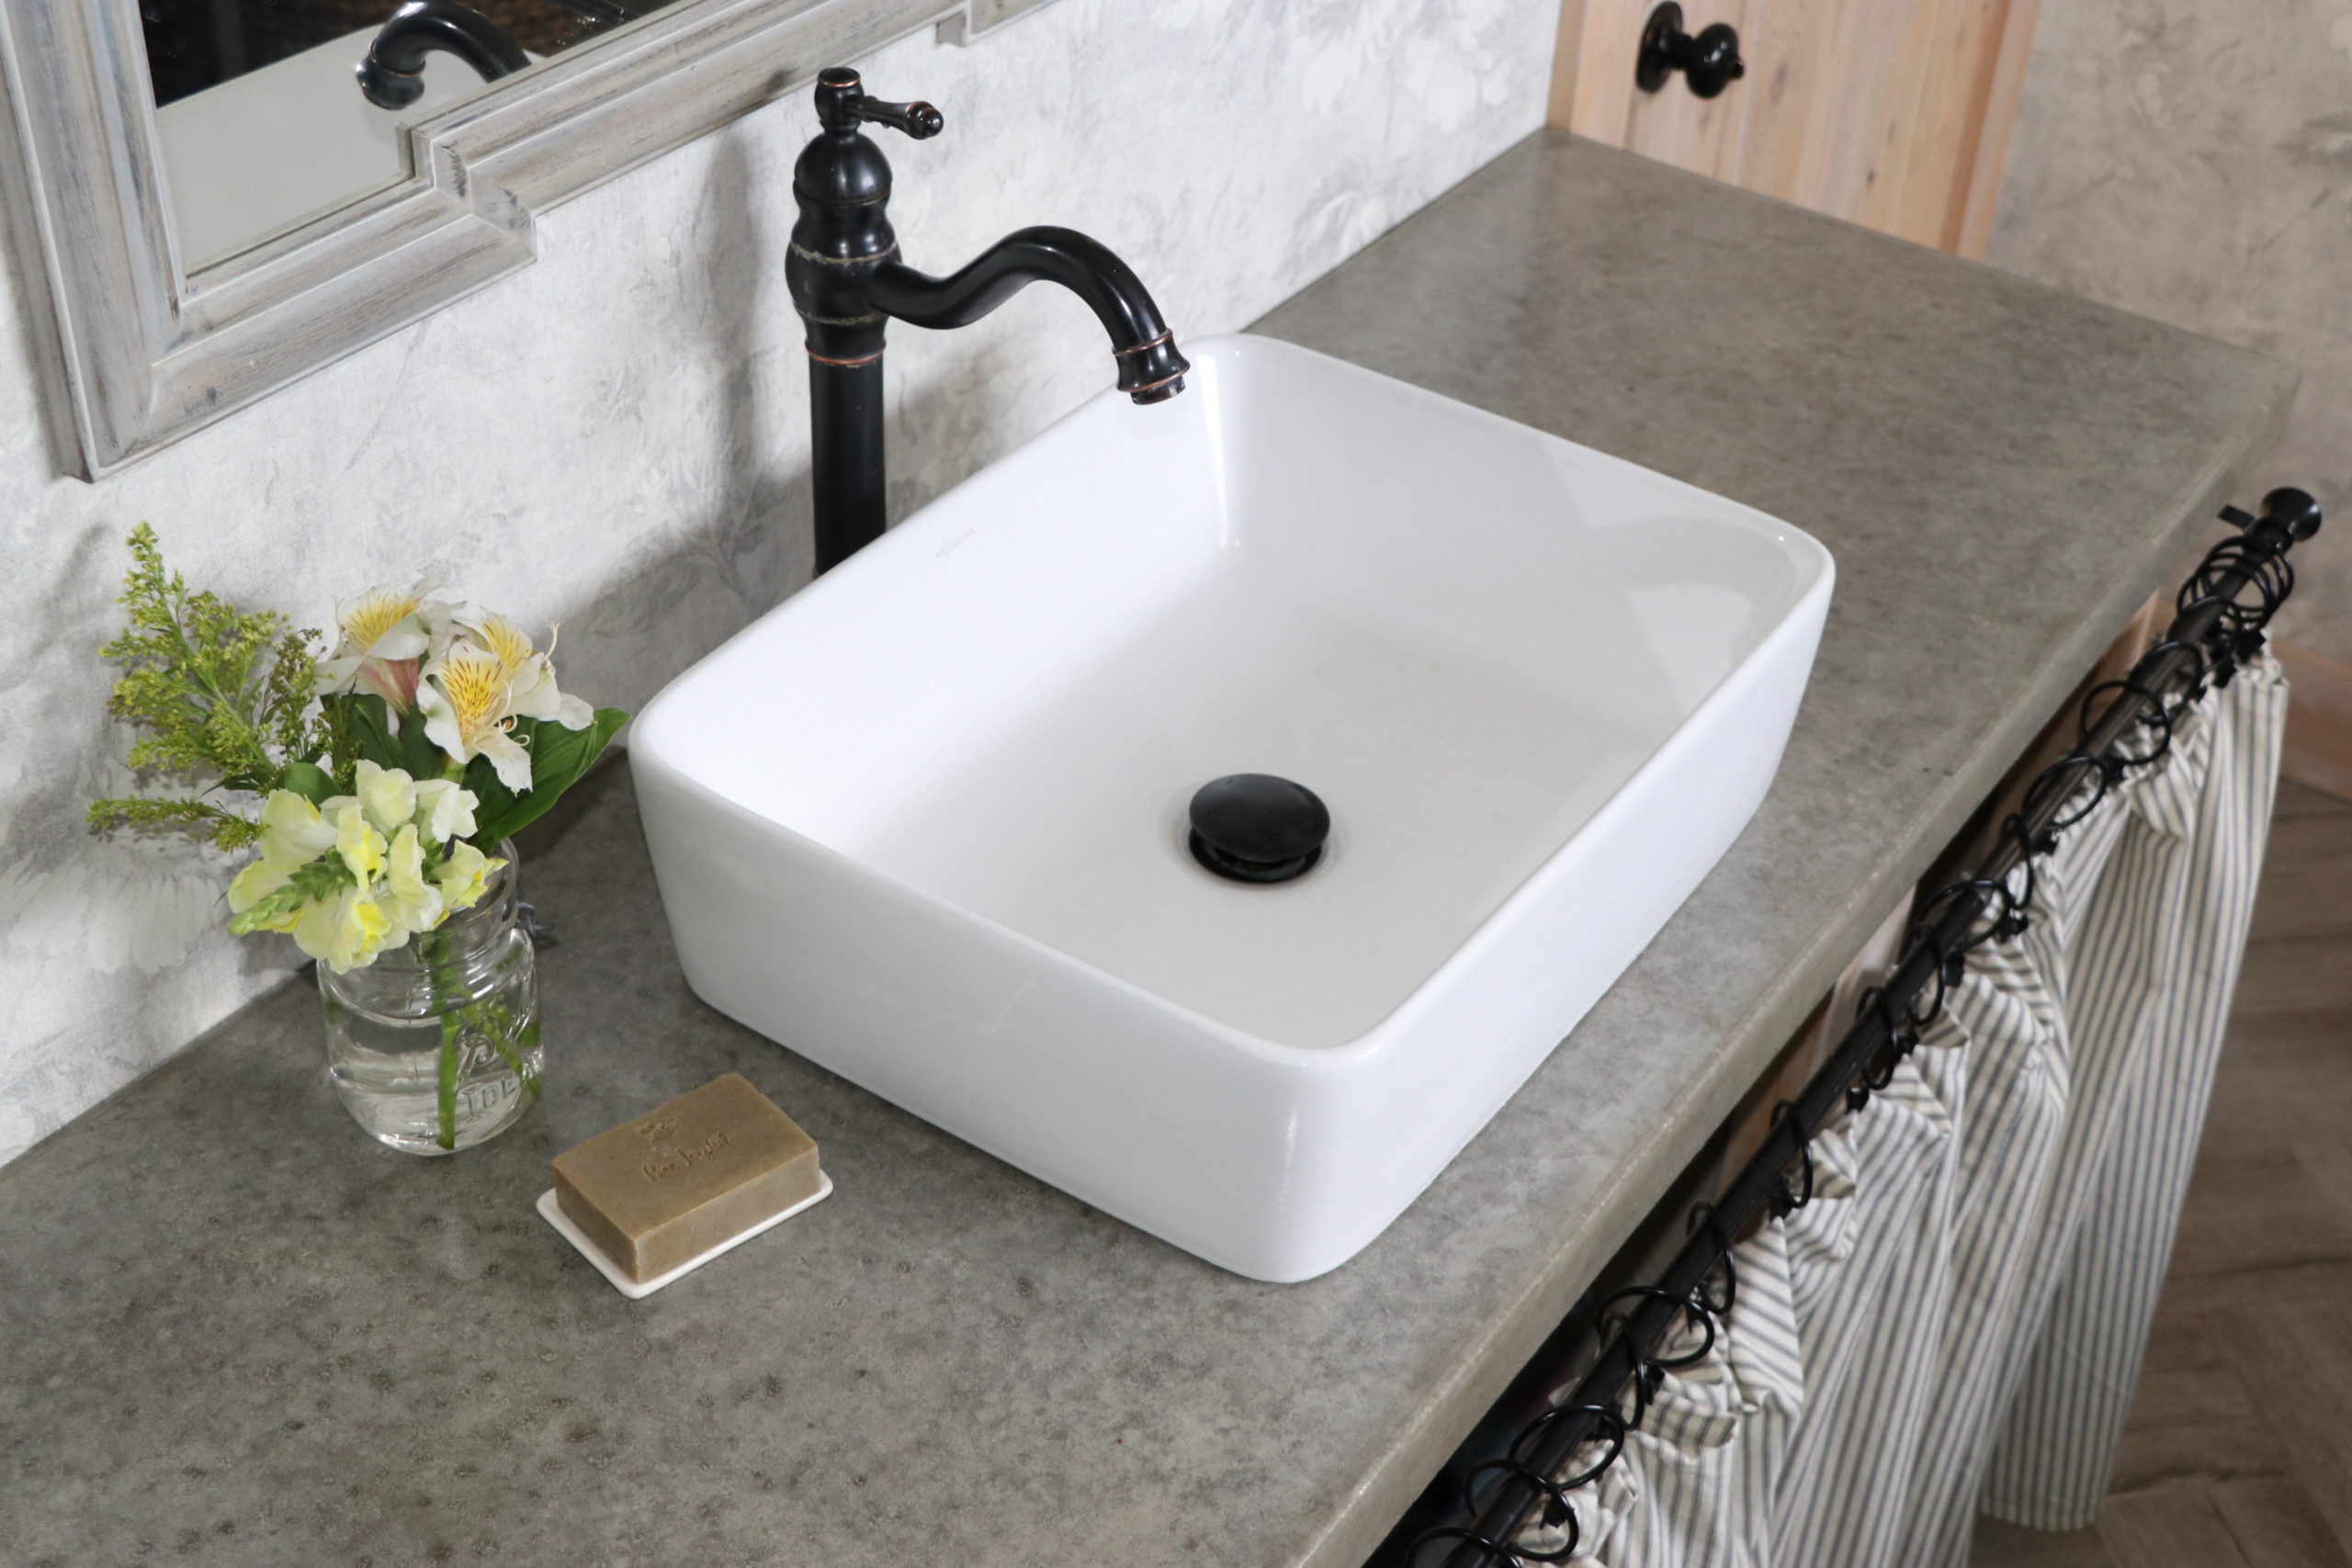
Concrete countertops with integrated sinks offer several advantages, including durability, customizability, and a unique aesthetic. They can be tailored to match any kitchen or bathroom style, from modern to rustic. Moreover, concrete’s ability to be tinted with various colors and embedded with decorative elements like glass, stones, or tiles allows for endless design possibilities. While the initial effort and time investment might be significant, the result is a high-quality, personalized feature that can enhance your home’s value and functionality.
One common issue when working with concrete countertops is cracking, which can occur if the concrete mix is not properly prepared or if the curing process is not adequately controlled. To minimize the risk of cracks, ensure a consistent mix and maintain a stable curing environment. Reinforcing the concrete with fibers or mesh can also help. Additionally, be mindful of the weight of the concrete countertop, especially for larger pieces. Ensuring your cabinets and supports can handle the load is critical to prevent structural issues.
Another potential challenge is achieving a smooth and level surface. Air bubbles and uneven pouring can result in a rough finish. Using a concrete vibrator and thorough troweling can help achieve a smoother surface. If any imperfections remain after curing, sanding and polishing can rectify them. Additionally, precise mold construction and careful handling during demolding are essential to avoid chips or breaks at the edges.

In terms of aesthetics, choosing the right sealer and polish is vital for achieving the desired look and functionality. Some sealers enhance the natural color of the concrete, while others provide a matte or glossy finish. It’s important to test a small area first to ensure the chosen product meets your expectations. Polishing can bring out the aggregate in the concrete, adding to its visual appeal, but it requires specialized equipment and skills. Taking the time to properly finish the surface can significantly impact the countertop’s final appearance.
Moreover, integrating a sink into the countertop adds complexity to the project. Precise planning for plumbing connections and ensuring a watertight seal around the sink are critical. Using foam or other suitable materials to create the sink mold ensures the shape and size are accurate. Careful placement and securing of the sink mold within the countertop mold help prevent shifting during the concrete pour. Post-installation, regularly checking the plumbing connections for leaks can prevent long-term water damage.

Common Mistakes to Avoid:
Inadequate planning: Failing to plan the project thoroughly can lead to issues with dimensions, design, and functionality. Always double-check measurements and consider all aspects of the countertop and sink integration.
Poor mold construction: A poorly constructed mold can result in leaks, uneven edges, and difficulty during demolding. Invest time in building a sturdy, well-sealed mold.
Improper mixing: Not following the concrete mix instructions can lead to a weak or crumbly countertop. Ensure you mix the concrete thoroughly and consistently.
Skipping reinforcement: Failing to reinforce the concrete can cause cracking and structural failure. Always include rebar or wire mesh in your mold.
Rushing the curing process: Allowing adequate time for the concrete to cure is essential for strength. Don’t rush this step, even if it’s tempting.
Neglecting finishing: Proper sanding, polishing, and sealing are crucial for both appearance and durability. Don’t skip these steps or cut corners.
Ignoring weight considerations: Ensure your cabinets and supports can handle the weight of the concrete countertop. Reinforce if necessary.
Inadequate sealing: Not applying enough sealer or using the wrong type can lead to stains and damage. Choose the right sealer and apply it thoroughly.
Poor installation: Ensure the countertop is level and securely attached to the cabinets. Check all plumbing connections for leaks.
Lack of maintenance: Regularly clean and reseal the countertop to maintain its appearance and functionality. Address any issues promptly.

How long does it take to make a concrete countertop with a sink?
Creating a concrete countertop with an integrated sink typically takes about a week from start to finish. This includes planning and designing, constructing the mold, pouring and curing the concrete, and finishing the surface. The curing process alone takes about 24 to 48 hours, but for maximum strength, it’s advisable to let the concrete cure for a full week. Finishing steps like sanding, polishing, and sealing add additional time. Proper planning and allowing adequate time for each step are crucial to achieving the best results.
What kind of concrete should I use for a countertop?
For a concrete countertop, it’s best to use a specially formulated countertop mix that includes additives for increased strength and workability. These mixes often contain finer aggregates and polymers that enhance the smoothness and durability of the final product. You can purchase pre-mixed bags from home improvement stores or concrete suppliers. It’s essential to follow the manufacturer’s instructions for mixing and curing to ensure the concrete achieves the desired properties.
Can I make a concrete countertop with a sink if I have no prior experience?
While making a concrete countertop with an integrated sink is a complex project, it is feasible for a determined DIY enthusiast with no prior experience. It requires careful planning, attention to detail, and patience. There are numerous resources available, including online tutorials, videos, and guides, that can help you through each step. Starting with a smaller, simpler project can also build your confidence and skills before tackling a full countertop with a sink.
How do I maintain a concrete countertop with a sink?
Maintaining a concrete countertop with a sink involves regular cleaning and periodic resealing. Use a mild soap and water solution for daily cleaning, avoiding harsh chemicals and abrasive cleaners that can damage the sealer. Spills should be wiped up promptly to prevent staining. Depending on usage, resealing the countertop every year helps maintain its protective layer and appearance. If stains or damage occur, addressing them promptly with appropriate cleaning or repair methods is essential.
Are concrete countertops with sinks durable?
Concrete countertops with integrated sinks are highly durable when properly constructed and maintained. Concrete is naturally strong and can withstand heavy use in kitchens and bathrooms. However, it is susceptible to cracking if not reinforced correctly or if subjected to sudden temperature changes. Regular sealing protects the surface from stains and moisture, enhancing its longevity. With proper care, a concrete countertop with a sink can provide many years of reliable service and aesthetic appeal.
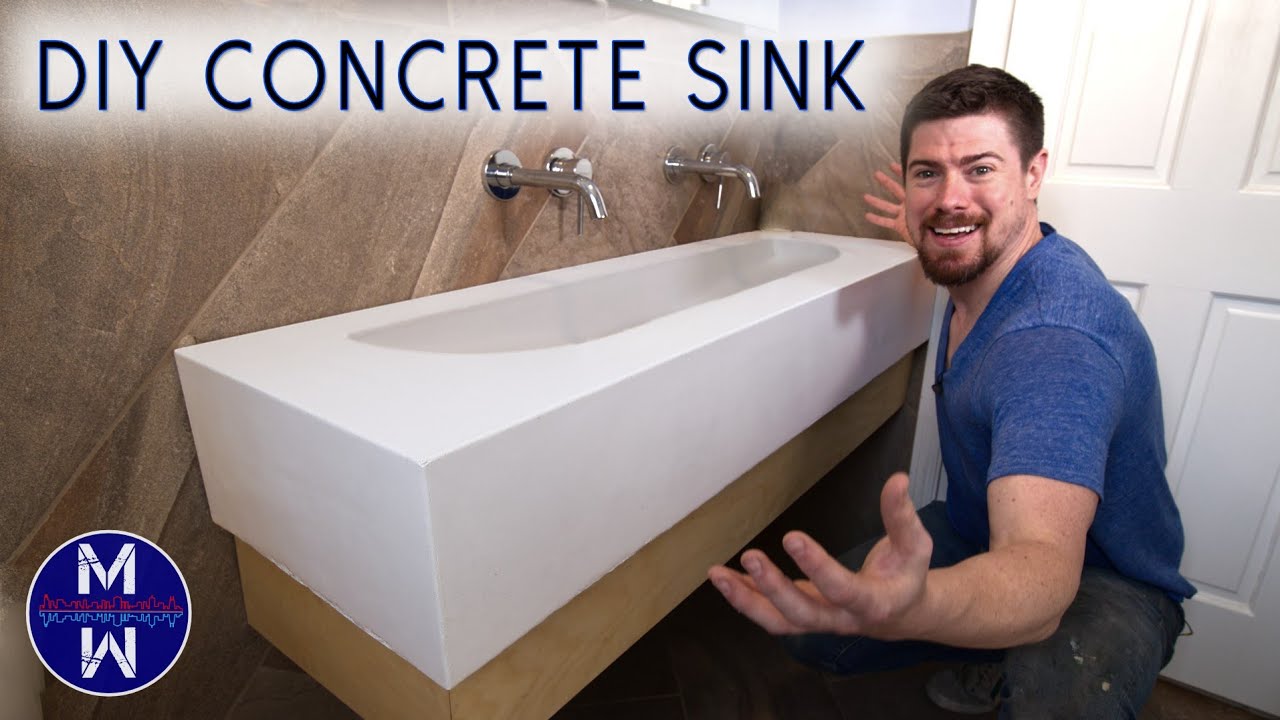
How to Build a Concrete Countertop

How To Make DIY Concrete Countertops Fletcher Creek Cottage
DIY CONCRETE SINK (Part 1 of 2)

DIY Concrete Sink u0026 Countertop ll Small Bathroom Renovation
Related articles:
- Outdoor Concrete Countertops
- How To Make Concrete Countertops Smooth
- Rustic Concrete Countertops
- Farmhouse Concrete Countertops
- Concrete Countertops Outdoor Kitchen
- How To Stain Concrete Countertops
- DIY Concrete Countertop Mix
- Concrete Countertops Made Easy
- Concrete Countertop Overlay
- Black Concrete Countertops