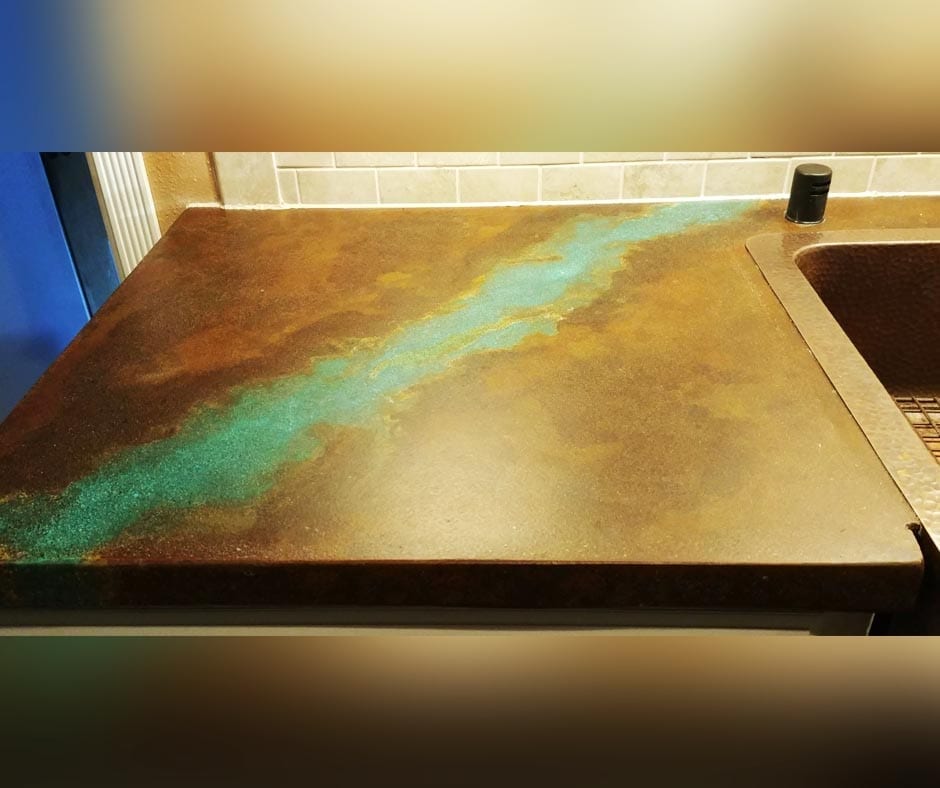
Staining a concrete countertop is an effective way to enhance its aesthetic appeal and durability, transforming a plain surface into a striking focal point in your kitchen or bathroom. The process of staining a concrete countertop involves several steps, including surface preparation, application of the stain, and sealing. Each step requires careful attention to detail to ensure a professional-looking finish. The first step is to thoroughly clean the countertop. This involves removing all dirt, grease, and any existing sealers or coatings. A clean surface ensures that the stain adheres properly and penetrates evenly into the concrete.
After cleaning, the next step is to repair any cracks or imperfections in the concrete. Use a concrete patching compound to fill in any gaps or holes. Smooth the surface with a trowel and allow the patch to dry completely. Sanding the entire countertop with a fine-grit sandpaper will help to create a smooth, even surface that is ready to accept the stain. It’s important to remove all dust and debris after sanding, as these can interfere with the staining process.
Selecting the right type of stain is crucial for achieving the desired look. Acid-based stains and water-based stains are the two most common types used for concrete countertops. Acid-based stains react chemically with the minerals in the concrete, creating a unique, variegated color effect. Water-based stains, on the other hand, offer a broader range of colors and are easier to apply, but they do not penetrate the concrete as deeply as acid-based stains. Each type has its advantages and considerations, so it’s important to choose the one that best fits your project’s needs.
Before applying the stain, it’s a good idea to test it on a small, inconspicuous area of the countertop. This will give you an idea of how the color will look once it is fully developed and allow you to make any necessary adjustments. When you’re ready to apply the stain, use a sprayer or brush to apply an even coat over the entire surface. For a more controlled application, you can use a sponge or cloth. Work in small sections and use a circular motion to ensure even coverage.

Allow the stain to dry according to the manufacturer’s instructions. Drying times can vary depending on the type of stain and the ambient conditions. Once the stain is dry, you can apply additional coats if you want a deeper, more intense color. Be sure to allow each coat to dry completely before applying the next. This layering technique can help to create a rich, multidimensional finish.
After achieving the desired color, the next step is to neutralize the acid stain (if applicable). This involves applying a mixture of water and baking soda to the stained surface to stop the chemical reaction. Rinse the countertop thoroughly with clean water to remove any residue. Allow the surface to dry completely before proceeding to the sealing stage. If you used a water-based stain, this step is not necessary.
Sealing the countertop is essential to protect the stained surface and enhance its durability. A high-quality concrete sealer will prevent stains, scratches, and other damage. There are various types of sealers available, including penetrating sealers, acrylic sealers, and epoxy sealers. Each type offers different levels of protection and a distinct finish, ranging from matte to high gloss. Choose a sealer that suits your aesthetic preferences and the level of protection needed for your countertop.

Apply the sealer in thin, even coats using a clean brush or roller. It’s important to follow the manufacturer’s instructions regarding drying times and the number of coats required. Allow each coat to dry thoroughly before applying the next. For a smooth, professional finish, you may need to sand the surface lightly between coats. Once the final coat is applied, allow the sealer to cure completely before using the countertop.
Regular maintenance is key to preserving the beauty and longevity of a stained concrete countertop. Clean the surface regularly with a mild detergent and water. Avoid using harsh chemicals or abrasive cleaners, as these can damage the sealer and stain. Reseal the countertop periodically, as recommended by the sealer manufacturer, to maintain its protective properties.
Staining a concrete countertop is a rewarding DIY project that can dramatically improve the look of your kitchen or bathroom. It requires careful planning, attention to detail, and patience. By following the steps outlined above, you can achieve a professional-quality finish that will last for years. Remember to take your time and follow all safety precautions, including wearing protective gear and working in a well-ventilated area.

Common Mistakes to Avoid
One common mistake when staining a concrete countertop is inadequate surface preparation. Failing to clean the surface thoroughly or to repair cracks and imperfections can result in an uneven or blotchy finish. Always ensure that the countertop is completely clean and smooth before applying the stain. Another mistake is not testing the stain on a small area first. This can lead to unexpected results and disappointment. Always test the stain in an inconspicuous area to see how the color develops.
Applying the stain too thickly is another common error. This can cause the stain to pool and create uneven color. It’s better to apply several thin coats, allowing each one to dry completely before applying the next. Similarly, not allowing sufficient drying time between coats can result in a subpar finish. Follow the manufacturer’s instructions regarding drying times to ensure the best results.
Skipping the neutralizing step after using an acid-based stain can cause the stain to continue reacting, potentially damaging the concrete. Always neutralize the stain as instructed and rinse thoroughly. Finally, neglecting to seal the countertop or choosing the wrong type of sealer can leave the surface vulnerable to stains, scratches, and other damage. Select a high-quality sealer and apply it correctly to protect your stained concrete countertop.

Can I stain an existing concrete countertop, or does it need to be newly poured?
Yes, you can stain an existing concrete countertop as long as it is in good condition. The key is to ensure that the surface is thoroughly cleaned and free of any previous sealers, coatings, or contaminants that might interfere with the stain’s penetration. Any cracks or imperfections should be repaired before staining. Proper preparation is crucial to achieving a uniform and long-lasting finish.
How long does the staining process take from start to finish?
The time required to stain a concrete countertop depends on several factors, including the size of the countertop, the type of stain used, and the number of coats applied. Generally, you should allow at least two to three days to complete the entire process. This includes time for cleaning and repairing the surface, applying the stain, allowing each coat to dry, neutralizing (if using an acid-based stain), and sealing. Some sealers may require additional curing time before the countertop can be used.
What are the differences between acid-based and water-based stains?
Acid-based stains react chemically with the minerals in the concrete to create a unique, variegated color effect. These stains penetrate deeply into the concrete and are very durable. However, they offer a more limited color palette and can be challenging to apply. Water-based stains, on the other hand, provide a broader range of colors and are easier to apply. They do not penetrate as deeply as acid-based stains but can still provide a beautiful finish. Both types of stains have their advantages and are suitable for different applications depending on the desired outcome.

How can I ensure an even color when staining my concrete countertop?
Achieving an even color when staining a concrete countertop requires careful surface preparation and application. Clean the surface thoroughly to remove all dirt, grease, and any previous sealers. Repair any cracks or imperfections and sand the surface to ensure it is smooth. When applying the stain, use consistent techniques and tools, such as a sprayer, brush, or sponge, and work in small sections. Apply thin, even coats and allow each coat to dry completely before applying the next. Testing the stain on a small area first can also help you gauge how the color will develop and ensure even application.
How do I maintain my stained concrete countertop to keep it looking new?
To maintain a stained concrete countertop, clean it regularly with a mild detergent and water. Avoid using harsh chemicals or abrasive cleaners, as these can damage the sealer and stain. Wipe up spills promptly to prevent staining. Periodically reseal the countertop as recommended by the sealer manufacturer to maintain its protective properties. Using cutting boards, trivets, and hot pads can also help protect the surface from scratches, heat, and other damage.
What should I do if my stained concrete countertop gets damaged or stained?
If your stained concrete countertop gets damaged or stained, the first step is to clean the affected area with a mild detergent and water. For deeper stains or damage, you may need to lightly sand the area and reapply the stain. If the damage is extensive, you might need to strip the sealer and stain from the entire countertop and start the staining process over. After addressing the damage, reseal the countertop to protect it from future issues. Regular maintenance and prompt attention to any damage can help keep your countertop looking its best.

Stained Concrete Creation

All About Concrete Countertops

Concrete Countertop made with combination of tints stains and dyes

How To Stain Faux Wood Stamped Concrete Direct Colors

Related articles:
- Concrete Countertop Overlay
- Black Concrete Countertops
- Marble Look Concrete Countertops
- Light Grey Concrete Countertops
- Concrete Countertop Design Ideas
- Light Colored Concrete Countertops
- Epoxy On Concrete Countertop
- Concrete Countertops Designs
- Concrete Countertops That Look Like Wood
- White Concrete Countertops